Sunday, March 4, 2012

Hoopla Jars

 Allow me to define what is contained in this little jar of fun...
Hoopla: excitement; bustling excitement or activity; commotion; hullabaloo; to-do. 
Synonyms: action, activity, bustle, buzz, stir, thrill, elation...
What is all the hoopla about you ask? In each jar there is a scroll. On each scroll there is a surprise. Each surprise is bustling with excitement... hoopla in a jar!  
Family night is a regular occurrence in our home. To add to the fun and memory making aspect of it all I came up with Hoopla Jars. On each scroll, in each jar contains a different thing to do as a family. From Hide and Seek to going out for ice cream, indoor family camp out, game night, movie night or even family craft night, in each jar there is sure to be hoopla... excitement. For my scrolls I came up with poems or riddles that lead up to the fun activity spelled out at the end of the scroll.
You can simply roll your scrolls, but I found using a wooden dowel (1/4") made it a lot faster and easier. 
 Here is an example of how I wrote out the fun activity in rhyme.
 Binder clips hold the scroll in place...
So a ribbon may be easily tied to hold it closed.
I used baby food jars and just spray painted the lids. Even if you don't have a baby, to buy several jars it will only be a few dollars. The numbers are scrapbook stickers.
We are taking turns choosing a jar. My girls get to choose the number jar they want to open. For us family night is on  Thursday nights, so needless to say the anticipation of opening a Hoopla Jar lasts all week! You could also roll dice to see which jar you will open or just open them in numerical order. After all the jars have been opened, mix up the scrolls and replace them in the jars or take family suggestions for new fun ideas. Hoopla Jars most definitely will be full of lasting memories!


Pin It Now!

Thursday, March 1, 2012

Haystacks

Simple. Delicious. Fun. These yummy treats are so easy to make, even a child can do it. In fact a child did make these. All week long my girls have been taking turns preparing dinner and dessert. My two younger girls paired up for this tasty treat called Haystacks.  The Internet is full of variations of Haystacks. We used a recipe from one of our favorite kid's cookbooks and want to share it with you!


Haystacks
2- 6oz. pkg. butterscotch chips
3/4 c. chopped or slivered almonds
5 oz. can chow mein noodles

In your slow cooker on High heat, melt the butterscotch chips. Using a wooden spoon, every few minuets stir the chips until they are melted.  When the chips are completely melted gently stir in the chow mein noodles and the almonds. When the Haystacks are mixed well, roll out a sheet of wax paper. Carefully scoop a spoon into the mixture and drop a spoon full onto the wax paper. Keep the Haystacks on the wax paper until set. You may speed up the process by placing them in the fridge.

Super easy and "kids" of all ages will love them.


Pin It Now!

Tuesday, February 14, 2012

L-O-V-E {Cake Pops}

Happy Valentines Day! A day to celebrate L-O-V- E, love! What a wondrous thing love is. What a difficult thing love can be. What a rewarding life lived when love is expressed.
Learning to love others is a precious gift not always easily attained. Receiving the love of others is a priceless treasure never to be taken for granted. Love is complex, multifaceted and never ending. Love has different faces. That of a romantic love or love from parent to child. Love for chocolate or love of an experience lived. Love of a friend and love for the unknown. Though love may take on different forms there is one thing common among all. The Bible puts it this way...
4 Love is patient, love is kind. It does not envy, it does not boast, it is not proud. 5 It does not dishonor others, it is not self-seeking, it is not easily angered, it keeps no record of wrongs. 6 Love does not delight in evil but rejoices with the truth. 7 It always protects, always trusts, always hopes, always perseveres. (1Corinthians 13:4-7)

L-O-V-E... LOVE! Thank God for love!
To express my love to my family I made one of their loves... cake pops!
Red Velvet insides scream Valentine's Day!
One of the loves of my life. He laughed at seeing our hands covered in red velvet cake. 
I LOVE his laugh!
 Another love of my life! Sneak peak for a later post is her hair bow.
 Cake Pops all wrapped up and ready to enjoy! Here is how I did it.
Fold a piece of wax paper in half. Cut a square (big enough to cover pop) keeping the fold at the top. Then with a zig zag stitch, place the wax paper on your sewing machine, with the fold end closest to you and the open end away from you. Sew up the side and turn as you go in a continuous stitch. Shaping like a heart. So in the end you will have zig zagged the side, the folded top and then the next side sewn. Leaving the bottom open to insert cake pop. Then tie with thread, ribbon, twist tie or what ever you choose. Just another idea of how to wrap up a cake pop. 


P.S. To make cake pops... the Internet is full of ways. Search my site for my Turkey {Shaped} Cake Pops.
Pin It Now!

Thursday, January 12, 2012

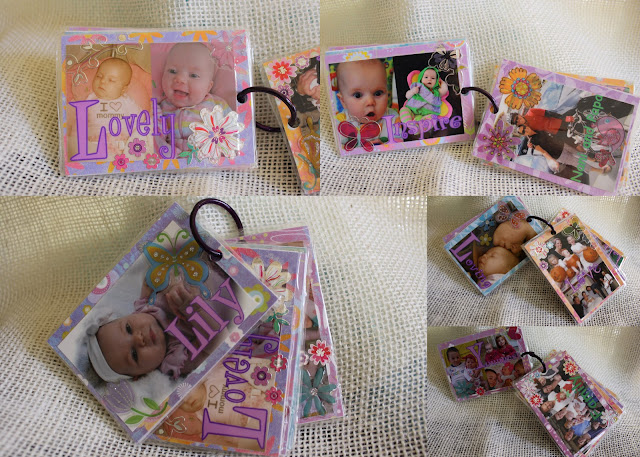
Photo Flip Books


Kids and photo lovers will just flip over theses Photo Flip Books! Every child I have ever met all around the world, LOVES to look at pictures of themselves and people they love. These little books can either be something a child holds onto or is placed on a bag. How about Grandma? Maybe she needs a little Grandma brag book she can attach to her knitting bag or her gym bag because not all Grandmas knit. :) What a great gift for the mom who has a diaper bag! These little books make for a fun addition to a Library book bag as well. More ideas: Play purse, ballet bag, backpack, karate bag, sleep over bag, swim lesson bag and so on.


 How to create these fun Photo Flip Books:

Edit the photos of your choice.
I created my collages using Picasa 3. In collage settings you need to create a custom ratio for 2.5 x 3.5 (wallet size). Even if you are using a single picture, create it in collage so it can be set at wallet size. Add the text you desire. You can go with a theme or as I did, spell out the child's name in an acronym.
B- beautiful    E- energetic    T- thoughtful    H- happy    Beth
Have your photos printed. I used Costco wallet size prints.
Supplies needed:
Card stock scrapbook paper (one paper per photo)
Stickers (I used scrapbook stickers)
Scrapbook sticky tape tabs (to attach photo to card stock)
Glue stick
Hole punch
Book rings
Books will need to be laminated. You can pay to have them done at Staples. If you do then make sure to tell them NOT to cut too close to the card stock paper edge. You want a good seal.Or you can laminate them yourself.
 Attach each photo to it's own card stock. Then glue the two pieces of card stock together.
For these cards I chose to spell out the child's name front and back. On one side I have a cover page with the child's name. On the reverse or back side of that page is the last letter of the child's name. This is the case if you are spelling out the name two times. The other option is to spell out the name on the front and then on the back side add photos with fun or special sayings.

Again, just to be extra clear... on one side the name is spelled from cover page to last letter in the name. On the reverse is last letter of the name to the cover page. So that once the cards are on the ring both ends have a cover page. This is only if you choose to spell out the name twice.

The second way is to spell out the name on one side and on its reverse side, photos with the words of your choice.
Hint: If you want to make a photo book for someone, but you don't have photos of them, but you are Facebook friends you can thief the pictures. If using an Apple device such as iPhone, iPad or iTouch you can click on the photo and select save. If working from another device, click on the photo and select download.
For these three photo books I used some of the same photos for the reverse side of the name side. Two last helpful tips: Make sure all your photos are going the same direction, for the front photo as well as the back photo. You can see example of that in some of the above pictures.  That way you have one top for the hole. I punched the hole once the card was laminated.

If you make these fun Photo Flip Books I would love to see what you create! Send me an email thecreatedhome@gmail.com


Pin It Now!

Wednesday, January 11, 2012

Indoor Hopscotch

As a child I loved, adored was thrilled by the simple game of Hopscotch. My childhood school yard like so many had this wondrous game. As I ran from one part of the playground to the next if I passed over the Hopscotch, I did not simply run over it. I  hopped through each square at every passing. My neighborhood sidewalks often were adorned with chalk drawn Hopscotch.
So what to do on those cold or wet rainy days when Hopscotch might just wash away or be covered in snow? Bring it INSIDE!
Using painters tape (so it easily removes) I created an indoor Hopscotch.
 We have graced our entry way floor with this game for over a month now and there is NOT a day it does not get hopped through. Even as an energy release during our homeschool days, I send the girls through the Hopscotch.
 Visitors have come over and it has been fun to see them return to carefree childhood days as they hop their way into our home. It may not be beautiful... but it sure is FUN!
 Fun links make for great individual Hopscotch markers.


Pin It Now!