Showing posts with label Creating. Show all posts

Friday, April 12, 2013

Art Display

Catering to my children's creativity is very important to me. Displaying their creativity is of equal value. So I knew that in our new basement playroom and craft room an art display was a must.
To keep within the theme of my craft and sewing room I thought the perfect way to make an art display was by using wooden thread spools.
I headed down to Hobby Lobby and found a bag of wooden thread spools just the size I desired as well as the Jute twine and clothespins.
I simply tied the twine onto the wooden spool and then wrapped it around. I cut the twine long enough to repeat the process on the other side. Then using large nails I hammered them through the hole of the spool. You could use screws and wall anchors to ensure the strength of your art display if you prefer.
Once your art display is complete it's time for your little or big artists to show off their masterpieces! It was really that simple and I just love the way it turned out!
I may just leave this art display in its natural form or may paint the clothespins. I haven't decided since I do love it just the way it is. Either way would be fun!


Pin It Now!

Friday, January 11, 2013

Personalized Mugs

Easy and fun are mugs with your own personal spin! With a Sharpie permanent marker an inexpensive mug, or even a plate, some creativity and an oven your project is done in 35 minutes.
Once your mug is designed to your liking (any mistakes can be removed with acetone nail polish remover) then place it on a cookie sheet and pop it in the oven. Bake at 350 degrees for 30 minutes and your design is now a permanent part of your mug.
These make for great gifts. Have your kids decorate their own hot coco mug or a special something for dad or grandparents.
Anyone will love sipping their favorite hot drink in a mug made special for them!
Happy decorating!

Pin It Now!

Tuesday, October 23, 2012

Personalized Bath Towels

Five kids sharing one bathroom means, desperate need for organization! I had been using a color towel system (see here) that was working great, but I wanted something a little more personal and fun. Here is what I came up with. I am just loving how the towels turned out. I also love that my kids are enjoying hanging up their own towels and no one is left guessing whose towel is whose.

 Here is a quick tutorial of what I did. If you are left with questions, please message me, or email me and I will do my best to clarify.
The first thing you want to do is locate your tag. It will need to be on the bottom and the back. Lay your towel down and measure the top part of your towel. My towels had a clear band of stitching, at the top. Just above that, I measured the width and length. I then measured that same width and length for my fabric adding extra for a 1/4inch seam all the way around.
Notice just bellow my fabric is the stitching on the towel. I wanted to place my fabric directly above the stitching.
I first pinned and ironed my seam. I did a 1/4inch seam all the way around my fabric. Then I pinned my fabric to my towel.
 Using a straight stitch, I sewed the fabric onto the towel.
Now time for the monogram! I used my word processor to print out the font I wanted for my monogram. It is best to use a bold font.
I used liquid stitch to hold the fabric monogram in place on the towel. I then used an applique stitch on my sewing machine and sewed the monogram onto the towel.
I chose to place my monogram at the opposite, top corner of my towel. That way when the towel wraps around the monogram shows. 


 Because towels need to hang up to dry, I decided they NEEDED an easy hang loop! Here is a quick how I did it picture. 
The loop once pinned on (to the backside of the towel) should measure about 4". I folded my towel in half to find the exact center and pinned it on there. Using a straight stitch I sewed back and forth a few times just to reinforce the loop, since it will be holding the weight of the towel.
Are they not just lovely? It really is a simple project for a great result! Hope you have fun personalizing your towels!


Pin It Now!

Wednesday, May 30, 2012

Ruffle Tote Bags

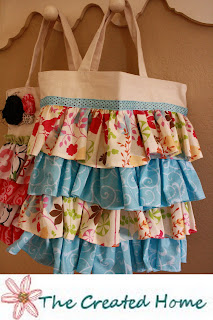
I love ruffles! I do! They just make me giddy like a little girl. So how perfect are ruffles on a plain, boring tote bag? I made these ruffled tote bags for my nieces and just adore how darling they turned out. My four girls fell in love with these ruffled bags as well and have placed their orders... Oh my lots of ruffles in store for me!

For these bags I began with a ready made tote bag that can be purchased at Hobby Lobby or for a tad cheaper at Walmart. Walmart has a package of 3 totes for under $6.00, that is a great deal.

Supplies:
Tote bag
1/4- 1/2 yard each of 2 coordinating fabrics for the ruffles (I always get extra fabric so I chose to go with 1/2 yd. each.)
Ribbon
Fabric for flowers,  if doing fabric flowers
Thread
 There are many different ways to sew a ruffle. I do NOT claim to be a ruffle expert, just a ruffle admirer.  Here is how I chose to sew the ruffles for my bags.
 Lay out your ruffles first to find out where you want them before you begin to sew.
 Once the front of your bag is finished with all it's beautiful ruffles, it is time to finish off the back.
 There are two different looks for your bag. The first option takes the ruffle almost to the top of the bag and  does not leave room for flowers. The second option does leave room at the top to add fabric flowers. I think both are super cute. Just depends on what you prefer.


Pin It Now!

Tuesday, February 14, 2012

L-O-V-E {Cake Pops}

Happy Valentines Day! A day to celebrate L-O-V- E, love! What a wondrous thing love is. What a difficult thing love can be. What a rewarding life lived when love is expressed.
Learning to love others is a precious gift not always easily attained. Receiving the love of others is a priceless treasure never to be taken for granted. Love is complex, multifaceted and never ending. Love has different faces. That of a romantic love or love from parent to child. Love for chocolate or love of an experience lived. Love of a friend and love for the unknown. Though love may take on different forms there is one thing common among all. The Bible puts it this way...
4 Love is patient, love is kind. It does not envy, it does not boast, it is not proud. 5 It does not dishonor others, it is not self-seeking, it is not easily angered, it keeps no record of wrongs. 6 Love does not delight in evil but rejoices with the truth. 7 It always protects, always trusts, always hopes, always perseveres. (1Corinthians 13:4-7)

L-O-V-E... LOVE! Thank God for love!
To express my love to my family I made one of their loves... cake pops!
Red Velvet insides scream Valentine's Day!
One of the loves of my life. He laughed at seeing our hands covered in red velvet cake. 
I LOVE his laugh!
 Another love of my life! Sneak peak for a later post is her hair bow.
 Cake Pops all wrapped up and ready to enjoy! Here is how I did it.
Fold a piece of wax paper in half. Cut a square (big enough to cover pop) keeping the fold at the top. Then with a zig zag stitch, place the wax paper on your sewing machine, with the fold end closest to you and the open end away from you. Sew up the side and turn as you go in a continuous stitch. Shaping like a heart. So in the end you will have zig zagged the side, the folded top and then the next side sewn. Leaving the bottom open to insert cake pop. Then tie with thread, ribbon, twist tie or what ever you choose. Just another idea of how to wrap up a cake pop. 


P.S. To make cake pops... the Internet is full of ways. Search my site for my Turkey {Shaped} Cake Pops.
Pin It Now!

Thursday, January 12, 2012

Photo Flip Books


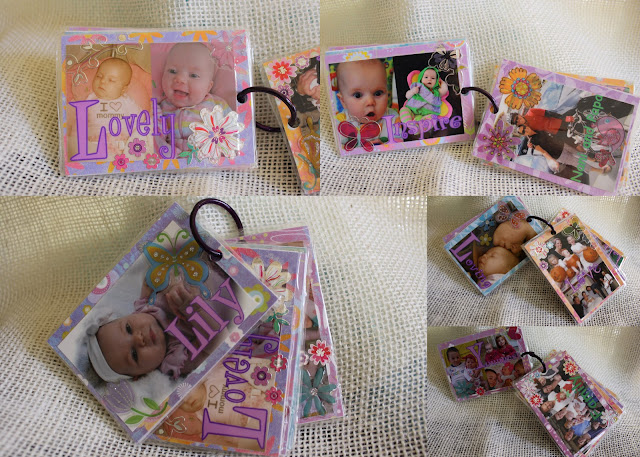
Kids and photo lovers will just flip over theses Photo Flip Books! Every child I have ever met all around the world, LOVES to look at pictures of themselves and people they love. These little books can either be something a child holds onto or is placed on a bag. How about Grandma? Maybe she needs a little Grandma brag book she can attach to her knitting bag or her gym bag because not all Grandmas knit. :) What a great gift for the mom who has a diaper bag! These little books make for a fun addition to a Library book bag as well. More ideas: Play purse, ballet bag, backpack, karate bag, sleep over bag, swim lesson bag and so on.


 How to create these fun Photo Flip Books:

Edit the photos of your choice.
I created my collages using Picasa 3. In collage settings you need to create a custom ratio for 2.5 x 3.5 (wallet size). Even if you are using a single picture, create it in collage so it can be set at wallet size. Add the text you desire. You can go with a theme or as I did, spell out the child's name in an acronym.
B- beautiful    E- energetic    T- thoughtful    H- happy    Beth
Have your photos printed. I used Costco wallet size prints.
Supplies needed:
Card stock scrapbook paper (one paper per photo)
Stickers (I used scrapbook stickers)
Scrapbook sticky tape tabs (to attach photo to card stock)
Glue stick
Hole punch
Book rings
Books will need to be laminated. You can pay to have them done at Staples. If you do then make sure to tell them NOT to cut too close to the card stock paper edge. You want a good seal.Or you can laminate them yourself.
 Attach each photo to it's own card stock. Then glue the two pieces of card stock together.
For these cards I chose to spell out the child's name front and back. On one side I have a cover page with the child's name. On the reverse or back side of that page is the last letter of the child's name. This is the case if you are spelling out the name two times. The other option is to spell out the name on the front and then on the back side add photos with fun or special sayings.

Again, just to be extra clear... on one side the name is spelled from cover page to last letter in the name. On the reverse is last letter of the name to the cover page. So that once the cards are on the ring both ends have a cover page. This is only if you choose to spell out the name twice.

The second way is to spell out the name on one side and on its reverse side, photos with the words of your choice.
Hint: If you want to make a photo book for someone, but you don't have photos of them, but you are Facebook friends you can thief the pictures. If using an Apple device such as iPhone, iPad or iTouch you can click on the photo and select save. If working from another device, click on the photo and select download.
For these three photo books I used some of the same photos for the reverse side of the name side. Two last helpful tips: Make sure all your photos are going the same direction, for the front photo as well as the back photo. You can see example of that in some of the above pictures.  That way you have one top for the hole. I punched the hole once the card was laminated.

If you make these fun Photo Flip Books I would love to see what you create! Send me an email thecreatedhome@gmail.com


Pin It Now!