Showing posts with label Decorating. Show all posts

Wednesday, August 29, 2012

Lampshade Makeover

What do an iron and a lampshade have in common? One very wonderful makeover project!
I bought this lampshade on clearance at Target with the purpose of giving it a makeover. Though it is cute, it is just not quite cute with the decor of my home so it needed a change. Using my iron, I set it on full steam and steamed around the shade. The steam and heat loosen and lift the glue making it possible to separate the fabric from the pieces needing to be reused.
 Here is the first part of the metal frame. In this particular shade there is a bottom frame as well rather than being all in one piece.

 Now that the shade is separated from the frame, it is time to separate the fabric from the shade.
 Using the steam once again iron over your fabric. Begin to lift the fabric from the shade.
Once you have separated the two, you now have a shade ready to be recovered. Lay out your shade face down on top of your fabric to use as a pattern. Cut around your shade leaving enough (but not too much) fabric to be wrapped around the edges of the frame. 
Then with spray adhesive or fabric glue brush on the glue on the wrong side or your fabric. Once your fabric is in place, use your hot glue gun to glue the top part of your frame in place. Once that is done it is now time to glue your bottom frame. After your frame is in place you will need to glue the edges of your frame. Go around the frame with your hot glue gun and wrap the fabric around the frame. 
Now time to "fun" it up with fringe! Don't let that glue gun cool because you will need it yet again to give your new lamp shade some sassy style. Remember the adorable play kitchen remodel? This stylish lamp coordinates with the bottom part of the ruffle. Oh the ear piercing squeals my girls let out, yes they love their new set up as much as I do.
 P.S. The lamp base was a garage sale find that used to be green. It got a fresh coat of black paint along with a new "hat" and I have to say this very inexpensive makeover turned out swell.


Pin It Now!

Monday, August 27, 2012

Play Kitchen Remodel

When my oldest daughter was two she received a wooden play kitchen for Christmas from her grandparents. She was so little she could barely see over the top of the kitchen. Eight years and four more kids later this wooden play kitchen is sill played with and well loved. So well loved that the paint on the burners was chipped and needed refreshing. Why stop there I thought? Why not do a kitchen remodel? That is exactly what I did and boy am I glad I took the time. The adorable factor was kicked way up! It is amazing what a little paint and fabric can do. Now many more fantastic "meals" can be created by my five darling little chefs!


For the knobs I added scrapbook stickers and then sprayed them with Mod Podge sealer.

 I simply hot glued the ruffle onto the kitchen door. I also used my nifty hot glue gun to add the embellishments.  I just love an upgraded kitchen don't you? Simply adorable and perfectly simple to do.


Pin It Now!

Friday, July 29, 2011

Daughter and Son Room Reveal


Howdy! Here it is, my sweet daughter and darling baby boy's bedroom!


My amazing mom made all of the bedding! Bed skirt and all! She is so talented and she is my MOM! I am just in love with how it turned out!
I will be adding more pillows. As for a head board... well this works for now.
For the blank wall I have a few ideas or it just may remain bare. Still deciding on that one.


 Horse Sheets just complete the look for my horse loving daughter! Notice the Ric Rac on the curtains? Love the added touch it brings to the room.
 Welcome home pictures from my youngest daughters to their baby brother! So sweet!


My God fearing husband is the Senior Pastor of our church. After having our son, I was unable to attend church one Sunday morning. My older daughters went to church with daddy. As daddy was preaching my daughter drew this portrait of him. She said, "this is what you look like on the inside daddy!" She was so proud of how fun her daddy is! Now her picture is displayed on her very own memo board in her new room!
 A boy girl room made with LOVE! You can check out my other posts about this room here.


Pin It Now!

Thursday, July 7, 2011

Built In Desk Makeover

I have a built in desk in my family room right off the kitchen. It has been a source of frustration for me for awhile now. It seems to not only be a bit of an eyesore but a clutter catcher as well. Since ripping it out was not an option I had to get creative. What could I do that would take away my extreme dislike for this area is what I began to ask myself. Well... here is what I came up with for now. I do have to say the dislike has disappeared! Amazing what a little paint and some creative touches can do to transform frustration into a feeling of satisfaction.


One of the things I really did not like was the open cubbies. My sweet husband uses this desk as well. Though I don't think he has ever sat at it, he does "store" stuff here. So I knew the cubbies were one area I needed to tackle. The paint color matches the accent wall in my family room as well as the bit of green I have in the kitchen. The cubby curtain matches my kitchen window valance that you can see here, as well as pillows I made for my couch. The top wall above the cabinets I am still deciding if and what I will do up there. 

The memo board... can you keep a secret? It is a plastic bin lid that I turned into a memo board. Remember the plastic bins I made into drawers in my daughter's room? You can see them here. Well the lids were just sitting with out purpose. Purposeless no longer! The fabric matches pillows I made for my family room couch.


For the letter bin I used Word once again to create what I wanted inside the frames.


The toile back ground in the above picture was copied from a wall paper sample I found on the Internet. I just Googled toile and found different options. I then pasted it into Word and added the text I wanted.
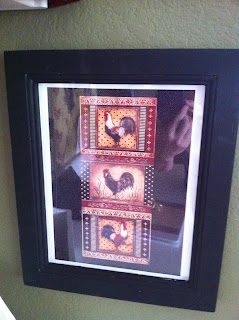
For the roosters I also used the Internet and Word. I found the rooster prints I liked, copied them and pasted them. Each rooster is an individual print that I just stacked one on top of the other. The background I used for the roosters is the same one I used for my letter bin.
The frames for the pictures also found themselves made over with paint. gotta love black paint!


For the curtain here is what I did. I measured the fabric to the size I would need. I then pinned the edges and sewed them. To create the ruffle, as I was sewing the top I folded the fabric, reversing the fold each time. For example if I folded to the left the next one I folded to the right and so on. I used a zig zag stitch with silver thread. To attach the curtain I used double stick Velcro.


The folder cover is a background you can choose for a blog. I copied and pasted it into word and then added the words I wanted. The folder is a great solution for me and all my random ideas I come up with. It helps me keep my thoughts of what I would like to do around my home organized. I have each room or area in my house broken down and divided with dividers. Each section has a plastic insert where I can slide magazine clippings in of things that inspire me.


So there we have it! Simple touches that have taken my frustration away! Total cost for me to transform this desk area... my time and that is all.
May I encourage you, if you have an area around your house causing you frustration. Look around and see what you could do to improve upon it with what you already have. 


Pin It Now!
Thursday, April 21, 2011

Searching For Creative Ideas for Twin Headboards

Sunset.com Photo by Megan Thompson; courtesy of MyHomeIdeas.com


I am on the search for creative ideas for a twin headboard. May I also add inexpensive ideas for a  twin headboard.
I am still in process of putting together my daughter and baby boy's room. One thing I am lacking is a bed frame or headboard for my daughter's bed. I thought it would be fun to be creative with coming up with a headboard for her instead of buying a whole bed frame. Later on in years when the two no longer are roomies, I may want this bedroom to have a full size bed and not spend the money on a temporary need for a twin bed now.  My original thought has been to make an upholstered headboard, but we will see if my search yields any other creative solutions.

These photos are some of the things I have come across. 
Photo from apartmenttherapy.com click here 4 Ideas for Cheap Headboards


Sunset.com Photo by Deborah Whitlaw Llewellyn; courtesy of MyHomeIdeas.com                                  


I love the rustic boards used as a headboard and what they did with the wall space. Also the frame bed, simply made from molding purchased at the hardware store and painted. I am thinking the middle of the frame can be either paint or fabric.
Some other ideas I came across were using shutters, or picket fence. Maybe even using shelves or cork board. There are a lot of really great ideas out there. Now I just have to decide what direction I want to go.
Here is a link to another really great sight for ideas. curbly.com

Pin It Now!

Wednesday, April 20, 2011

Hanging Baskets Hung


Here is what became of my painted baskets. One of them will hold diapers and such for baby. Just a small peak into my still in progress Horse Theme boy/ girl bedroom.You can check out previous posts here Boy/ Girl Bedroom.

A very excited little horse lover!


Pin It Now!

Sunday, February 27, 2011

Hay Is For Horses and A is For Aubrey


My sweet seven year old Aubrey is a horse lover! Starting at age three horses captured her wild heart! So for her fourth Birthday I arranged for her to get to ride her first horse. She was grinning from ear to ear and my mothers heart was overwhelmed! I love seeing my children passionate and each have their own things that get their little hearts excited.
Here we are four years later and Aubrey's love for horses has remained! You never know with kids, they go through so many stages as they grow and develop into big grown up people. When a passion is struck in the heart as horses have been for Aubrey, I can not help but to want to nurture that desire, that love, that interest.

With the upcoming arrival of our much awaited little boy, I had to play musical rooms for yet another time. I decided on blessing my oldest with her own room once again. She is the only introverted child I have and she thrives on having a space to call her own. I moved my three year old in with the five year old and the seven year old will share with the new baby (for the next couple of years that is). So what to do with a boy girl room? Aubrey is as much boy as I have had... a very active little girl who happens to have the favorite color blue! Perfect choice to room with a baby brother! Then it hit me, her love for horses could make for the most wonderful boy girl combination room.

So I hit the Internet for ideas and inspiration.
 I put together some photo collages of things that caught my eye. Things that could maybe be purchased or recreated by me.
I came across this fabric and I just fell in love with the vintage western look. This fabric just makes me want to sing, "Oh, yippee-i-o-ki-ay, yippee-i-o-ki-ay... I am an old cowhand..."
After searching and searching I found my baby boy's bedding and guess what it had this exact fabric! I am just thrilled! The order has been placed (thanks mom) and things are beginning to come together!
Now I will just be checking the doorstep every five minuets waiting for my package!
Don't worry I have plans for Aubrey's cowgirl side of the room too! Now I can only hope all the visions I have in my head for the room turn out. Oh isn't this exciting! I just can't wait to see the end result!


Pin It Now!

Sunday, February 13, 2011

Laundry Room Makeover

The time has come, I have given up, given in and got to work! My laundry room (really it is a closet but I can pretend) was a dreaded place for me to be. Not just because of the piles and loads and mounds of laundry that await me each day, but because it was aesthetically unpleasing to my eyes! The thought that my piles are going to increase with adding a new baby to our family got me on the move! I had to solve this ugly, dreaded problem. No wonder the laundry would pile... it is called PROCRASTINATION! I wanted a space that I wanted to be in. A space that could be peaceful for me. A place  where my mind could wander and ponder thoughts as I dump clothes in the washer and fold them from the dryer.
I began pouring through the Internet to get some ideas or inspiration. What I got at first was depressed! So many beautiful laundry rooms out there to be desired. So I wiped away the drool and came back to reality. I decided I would challenge myself to be creative with what I have. The result... a laundry room makeover that only cost me my time, oh and the big sum of $5.00! Guess what, I also had fun doing it! Though it will not find it's way to any magazine pages or even cause one to drool, it is a definite improvement from what it was before! My goal was accomplished! I now have a place that is not dreaded but peaceful and transporting. My thoughts can think and I can accomplish a necessary chore for my family happily.

Here is what took place


I first thought maybe I could live with a small change. So I replaced not so pretty laundry baskets with ones  I like. NOPE not enough of a difference to make a difference. Something more HAD to happen!


  I painted the walls with Quietude from Sherwin Williams. I had a whole can left over from painting our master bathroom. The color looks and feels different being in the laundry room due to the difference in size and lighting. The pictures do not capture the true color at all!     
 Here is the whole of it... the laundry closet room that is!
 I will  change out the blue bins (or spray paint them black) and find a solution for the laundry soap. The clock I thought would be a good idea to glance up at when a load is put in the washer and dryer. Since I am notorious for forgetting my laundry and end up rewashing loads maybe knowing the time will help. I can be hopeful!
 The small jar used to hold Alfredo sauce from Classico. For fun and whimsy I hung the picture using clothes pins and ribbon. The jar holding clothes pins also has seashells from the beaches I grew up on! Peaceful! All of this sitting on my thrift store shelf for a whopping $.99!
 I painted all the frames and two shelves with the color I used to paint my classroom. I also made all the signs! Amazing what you can do using Word, different fonts downloaded from the Internet and a color printer!

 Hiding back behind the baskets is a trashcan to store toss all the dryer lint and sheets.
 I wanted some Bible verses and inspirational reminders of what this room is now intended to be.
 I took ideas from the Internet of laundry room sayings and then either changed them a bit and made them my own or made up my own like the one below.
Oh joy! There is the dryer chiming now, inviting me to come and enjoy my new space as I, wash, dry, fold and repeat (another cute laundry room saying out there!)
Hope you have been inspired to be creative with what you may already have to beautify a space you want to be.


Pin It Now!