Showing posts with label Life's Moments. Show all posts

Thursday, March 21, 2013

Construction Journey Part 3

Raise your hand if you can relate... Not everything you plan works out exactly the way you plan it to. This is very true in my life and it brings to mind the scripture, "The plans of the heart belong to man but the final reply comes from The Lord."
We left our sunny vacation spot on Wed. to start the two day drive back home. The first day of our drive went like a dream. We just couldn't believe how smooth everything went, especially when traveling with five young kids! When we reached our target city and checked into our hotel for the night my oldest daughter and I did a happy dance! We actually were going to make it home just after our kitchen countertops would be installed and in perfect time to watch the backsplash installation. Then came the text from our contractor informing me of the "less than ideal" situation he encountered with our granite slabs. Don't worry he told me, he and his crew were working round the clock to make sure all was perfect. However... However is always the clue word for, there is a change in what you had planned ... However the countertops will not be going in on the next day as planed. Yes there they were... Those words, "Not as planned." At first we were disappointed. My first thought was, "Oh man! I have waited so long and I really thought I would be walking in the door from vacation to a new kitchen." Then it hit me! Disappointment disappeared as excitement rose up in my heart when I realized, this may not be what was planned but it is what I had hoped for. I had hoped I could be home to witness the installation of my kitchen. Now I would be home! Yay! The plan was now set, we would make it back home in time for our kitchen transformation.
Begin day two of our road trip and those clear skies we had on day one, would not be present the whole drive through. We were informed of the possibility of having to stop for the night. Hey wait a second that isn't the plan. We had planned to make it home today. To be home in time for installation. Plan changed once again. Well the weather did pick up and due to snowy conditions the freeway was closed and we were left with no choice but had to spend another night in a hotel. This bringing me back to missing out on countertop install.
With in all these unplanned moments are treasures I never could have planned. Lots of laughs were had. After a quick check into the last available hotel we headed to a pizzeria for an early dinner. I punched in the address into the GPS and began to follow "the nice lady's" instructions. Round and round we went yet never arriving at our destination. Frustration was beginning to set in, then my five year old pipes up from the back seat, "Mom! I don't know if you realize but we keep going in circles!" My mom and I broke out laughing! We gave up on the GPS and went to a different pizza place that we had circled around all those many times around. Turned out it was better than what we had originally planned! Another funny situation and now treasured moment we have is, as it was snowing like crazy, the only shoes I had accessible for my girls were flip flops. Slushing around the parking lot was not my plan but for the short distance we had to walk, the girls had a blast. My oldest daughter teased me saying, "Mom people are going to think your a terrible mom putting your kids in flip flops in this weather!" Another burst of laughter in our series of "Not what I had planned" moments!
So here I am in my unplanned, unexpected second hotel for what is now a three, maybe more, day road trip home.
As for our kitchen, I will miss the counter install but the "plan" is I will be home for the install of the backsplash.
Our carpet was installed in the basement today, earlier than planned. Here are the pictures my sweet husband (who flew home from our vacation) sent me.
Let me just add, I am glad I don't have the final say on all of my plans. They usually turn out better than I could have ever planned!


Pin It Now!

Thursday, August 30, 2012

A Steamy Post

It's official! I have fallen in complete and total love! How did I not know how wonderful... how did I not realize when it was right there sitting on my laundry room shelf all these years?

My iron! I am swooning for this "hot" thing. I used to think of it as a steamy chore thing-a-ma-bob that I never used. Why use an iron when a hair dryer or clothes dryer works just fine... duh! Okay so for my wrinkly clothes they still will never be introduced to my new love, but for sewing and crafting HELLO! Love, I tell you! L-O-V-E, love! You know the iron never leaves its perch when your four year old daughter says, "Mom! What's THAT???" when you pull it out. I am happy to report she now knows what an iron is and made the quick connection to a small toy version she saw at Target, "Ohhhhh! That is what I have seen at Target. I always wondered what that was. Can I get one too?"
I am thinking this is a Christmas list must have! After all how can I deny her such love?


Pin It Now!

Saturday, May 26, 2012

Baseball Cake Pops and Baseball Cupcakes

Can it be? An actual post published? I am ecstatic to be back blogging again. So much has happened in my absence. One thing I have definitely come to realize is being a mommy to five young children, the wife of a Pastor and Homeschooling, to really make my plate overflow, keeps me busy! I honestly love the life God has graced me with and wouldn't want it any other way.

One big event in the month of May was my son's first Birthday. For those of you who don't know, the fact he is on this earth is nothing short of God's great hand at work. You can read more about that here.
 To celebrate the joyous occasion, I made baseball cake pops and cupcakes. It seemed to be the perfect choice since my son is named Nolan Ryan after my hubby's favorite baseball player.
I do have to warn that the stitching on the cake pop proves more difficult than I anticipated. I tried different methods and the one that I found to work best was using red candy melts in a piping bag with a small writing tip. The food coloring pens do not get the job done! I also suggest looking at a baseball so you can follow the pattern in which the stitching flows around the ball.


Here is a quick tip I have found when working with candy melts. Since I do not own a double boiler or any other fancy candy melting contraption, I created my own. By using a small sauce pan with water in it and a small metal bowl to sit on top. It works wonderfully in melting the candy coating for the cake pops.

For the inside of the baseballs, I used white cake and white frosting since baseballs are white. The how to, on making cake pops can be found all over the web. Click here to see my Turkey shaped cake pop post to see some websites I have used for the "how to."


For the stitching on the cupcakes I used a gel writing/ decorating tube. The gel can also be used on the cake pops and then place them into the fridge to set. However the gel will not harden like the candy melts do. I must say, the gel is much easier to use! It just depends on what your plans are. If you are wrapping your pops or transporting them I recommend the candy melts and not the gel.


Pin It Now!

Sunday, March 4, 2012

Hoopla Jars

 Allow me to define what is contained in this little jar of fun...
Hoopla: excitement; bustling excitement or activity; commotion; hullabaloo; to-do. 
Synonyms: action, activity, bustle, buzz, stir, thrill, elation...
What is all the hoopla about you ask? In each jar there is a scroll. On each scroll there is a surprise. Each surprise is bustling with excitement... hoopla in a jar!  
Family night is a regular occurrence in our home. To add to the fun and memory making aspect of it all I came up with Hoopla Jars. On each scroll, in each jar contains a different thing to do as a family. From Hide and Seek to going out for ice cream, indoor family camp out, game night, movie night or even family craft night, in each jar there is sure to be hoopla... excitement. For my scrolls I came up with poems or riddles that lead up to the fun activity spelled out at the end of the scroll.
You can simply roll your scrolls, but I found using a wooden dowel (1/4") made it a lot faster and easier. 
 Here is an example of how I wrote out the fun activity in rhyme.
 Binder clips hold the scroll in place...
So a ribbon may be easily tied to hold it closed.
I used baby food jars and just spray painted the lids. Even if you don't have a baby, to buy several jars it will only be a few dollars. The numbers are scrapbook stickers.
We are taking turns choosing a jar. My girls get to choose the number jar they want to open. For us family night is on  Thursday nights, so needless to say the anticipation of opening a Hoopla Jar lasts all week! You could also roll dice to see which jar you will open or just open them in numerical order. After all the jars have been opened, mix up the scrolls and replace them in the jars or take family suggestions for new fun ideas. Hoopla Jars most definitely will be full of lasting memories!


Pin It Now!

Thursday, January 12, 2012

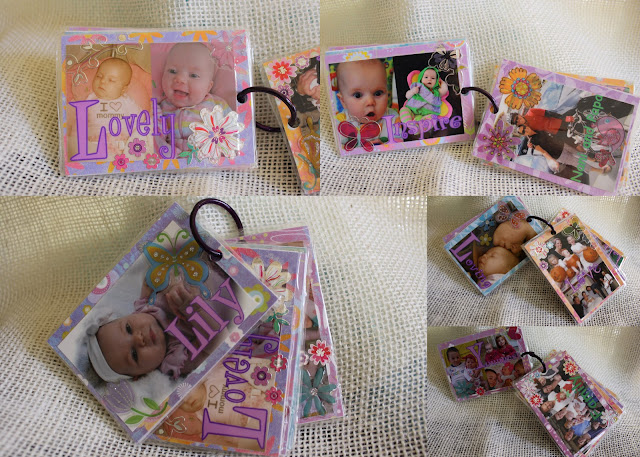
Photo Flip Books


Kids and photo lovers will just flip over theses Photo Flip Books! Every child I have ever met all around the world, LOVES to look at pictures of themselves and people they love. These little books can either be something a child holds onto or is placed on a bag. How about Grandma? Maybe she needs a little Grandma brag book she can attach to her knitting bag or her gym bag because not all Grandmas knit. :) What a great gift for the mom who has a diaper bag! These little books make for a fun addition to a Library book bag as well. More ideas: Play purse, ballet bag, backpack, karate bag, sleep over bag, swim lesson bag and so on.


 How to create these fun Photo Flip Books:

Edit the photos of your choice.
I created my collages using Picasa 3. In collage settings you need to create a custom ratio for 2.5 x 3.5 (wallet size). Even if you are using a single picture, create it in collage so it can be set at wallet size. Add the text you desire. You can go with a theme or as I did, spell out the child's name in an acronym.
B- beautiful    E- energetic    T- thoughtful    H- happy    Beth
Have your photos printed. I used Costco wallet size prints.
Supplies needed:
Card stock scrapbook paper (one paper per photo)
Stickers (I used scrapbook stickers)
Scrapbook sticky tape tabs (to attach photo to card stock)
Glue stick
Hole punch
Book rings
Books will need to be laminated. You can pay to have them done at Staples. If you do then make sure to tell them NOT to cut too close to the card stock paper edge. You want a good seal.Or you can laminate them yourself.
 Attach each photo to it's own card stock. Then glue the two pieces of card stock together.
For these cards I chose to spell out the child's name front and back. On one side I have a cover page with the child's name. On the reverse or back side of that page is the last letter of the child's name. This is the case if you are spelling out the name two times. The other option is to spell out the name on the front and then on the back side add photos with fun or special sayings.

Again, just to be extra clear... on one side the name is spelled from cover page to last letter in the name. On the reverse is last letter of the name to the cover page. So that once the cards are on the ring both ends have a cover page. This is only if you choose to spell out the name twice.

The second way is to spell out the name on one side and on its reverse side, photos with the words of your choice.
Hint: If you want to make a photo book for someone, but you don't have photos of them, but you are Facebook friends you can thief the pictures. If using an Apple device such as iPhone, iPad or iTouch you can click on the photo and select save. If working from another device, click on the photo and select download.
For these three photo books I used some of the same photos for the reverse side of the name side. Two last helpful tips: Make sure all your photos are going the same direction, for the front photo as well as the back photo. You can see example of that in some of the above pictures.  That way you have one top for the hole. I punched the hole once the card was laminated.

If you make these fun Photo Flip Books I would love to see what you create! Send me an email thecreatedhome@gmail.com


Pin It Now!

Wednesday, January 11, 2012

Indoor Hopscotch

As a child I loved, adored was thrilled by the simple game of Hopscotch. My childhood school yard like so many had this wondrous game. As I ran from one part of the playground to the next if I passed over the Hopscotch, I did not simply run over it. I  hopped through each square at every passing. My neighborhood sidewalks often were adorned with chalk drawn Hopscotch.
So what to do on those cold or wet rainy days when Hopscotch might just wash away or be covered in snow? Bring it INSIDE!
Using painters tape (so it easily removes) I created an indoor Hopscotch.
 We have graced our entry way floor with this game for over a month now and there is NOT a day it does not get hopped through. Even as an energy release during our homeschool days, I send the girls through the Hopscotch.
 Visitors have come over and it has been fun to see them return to carefree childhood days as they hop their way into our home. It may not be beautiful... but it sure is FUN!
 Fun links make for great individual Hopscotch markers.


Pin It Now!