Thursday, January 12, 2012

Photo Flip Books


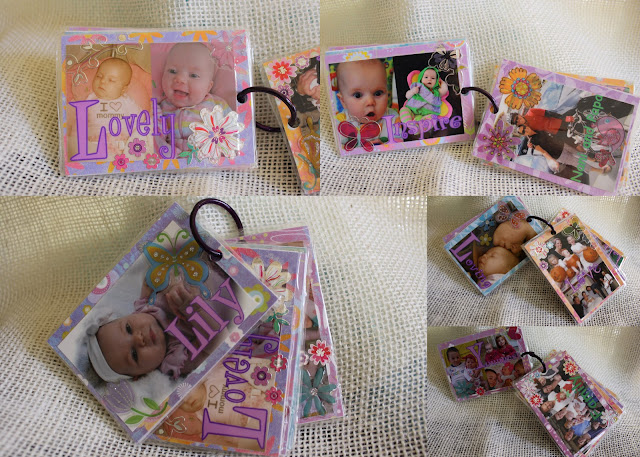
Kids and photo lovers will just flip over theses Photo Flip Books! Every child I have ever met all around the world, LOVES to look at pictures of themselves and people they love. These little books can either be something a child holds onto or is placed on a bag. How about Grandma? Maybe she needs a little Grandma brag book she can attach to her knitting bag or her gym bag because not all Grandmas knit. :) What a great gift for the mom who has a diaper bag! These little books make for a fun addition to a Library book bag as well. More ideas: Play purse, ballet bag, backpack, karate bag, sleep over bag, swim lesson bag and so on.


 How to create these fun Photo Flip Books:

Edit the photos of your choice.
I created my collages using Picasa 3. In collage settings you need to create a custom ratio for 2.5 x 3.5 (wallet size). Even if you are using a single picture, create it in collage so it can be set at wallet size. Add the text you desire. You can go with a theme or as I did, spell out the child's name in an acronym.
B- beautiful    E- energetic    T- thoughtful    H- happy    Beth
Have your photos printed. I used Costco wallet size prints.
Supplies needed:
Card stock scrapbook paper (one paper per photo)
Stickers (I used scrapbook stickers)
Scrapbook sticky tape tabs (to attach photo to card stock)
Glue stick
Hole punch
Book rings
Books will need to be laminated. You can pay to have them done at Staples. If you do then make sure to tell them NOT to cut too close to the card stock paper edge. You want a good seal.Or you can laminate them yourself.
 Attach each photo to it's own card stock. Then glue the two pieces of card stock together.
For these cards I chose to spell out the child's name front and back. On one side I have a cover page with the child's name. On the reverse or back side of that page is the last letter of the child's name. This is the case if you are spelling out the name two times. The other option is to spell out the name on the front and then on the back side add photos with fun or special sayings.

Again, just to be extra clear... on one side the name is spelled from cover page to last letter in the name. On the reverse is last letter of the name to the cover page. So that once the cards are on the ring both ends have a cover page. This is only if you choose to spell out the name twice.

The second way is to spell out the name on one side and on its reverse side, photos with the words of your choice.
Hint: If you want to make a photo book for someone, but you don't have photos of them, but you are Facebook friends you can thief the pictures. If using an Apple device such as iPhone, iPad or iTouch you can click on the photo and select save. If working from another device, click on the photo and select download.
For these three photo books I used some of the same photos for the reverse side of the name side. Two last helpful tips: Make sure all your photos are going the same direction, for the front photo as well as the back photo. You can see example of that in some of the above pictures.  That way you have one top for the hole. I punched the hole once the card was laminated.

If you make these fun Photo Flip Books I would love to see what you create! Send me an email thecreatedhome@gmail.com


Pin It Now!

Wednesday, January 11, 2012

Indoor Hopscotch

As a child I loved, adored was thrilled by the simple game of Hopscotch. My childhood school yard like so many had this wondrous game. As I ran from one part of the playground to the next if I passed over the Hopscotch, I did not simply run over it. I  hopped through each square at every passing. My neighborhood sidewalks often were adorned with chalk drawn Hopscotch.
So what to do on those cold or wet rainy days when Hopscotch might just wash away or be covered in snow? Bring it INSIDE!
Using painters tape (so it easily removes) I created an indoor Hopscotch.
 We have graced our entry way floor with this game for over a month now and there is NOT a day it does not get hopped through. Even as an energy release during our homeschool days, I send the girls through the Hopscotch.
 Visitors have come over and it has been fun to see them return to carefree childhood days as they hop their way into our home. It may not be beautiful... but it sure is FUN!
 Fun links make for great individual Hopscotch markers.


Pin It Now!

Monday, January 9, 2012

The Unexpected... Be Encouraged

Oh Blogland we have been distance friends for quite some time now. Though I have been absent, my thoughts have not been far from all of you! It is good to be back.

What a busy life my days produce. Mommy to five and among them a baby, wife of a Pastor, friend, homemaker, shower taker, meal maker, laundry doer and all else that fills my days. Seems that Blogger has not made it to the list of planned or that of the unexpected until now.

Oh the unexpected! From the spilled milk dripping from table to floor and atop the happy, no longer clean dog, to the uneven load in the washer that dances and jumps its way across the room, to a comb so tangled in your daughter's hair you fear the only solution is to make her partially bald. Yes I speak from actual experience from just this past week. The unplanned. The unexpected when it strikes it can derail the plans once held on a day. That has been the picture of my life. The shadow that hangs over every day. I have now begun to plan, make room, make allowance for the unexpected. I have come to expect, the unexpected. It almost always seems to make an appearance.

I am so encouraged by the truth we find in the Word of God. "The heart of man plans his way, but the Lord establishes his steps." Proverbs 16:9. I am thankful to know that it is God whom guides my steps. It is He whom establishes what my day will be. I praise God that in that unplanned moment of untangling a comb from a little girl's hair, a memory was made that I would have NEVER put on the day's agenda. I became a star in my children's eyes as they watched me with great determination free the once, tightly bound comb. Valuable lessons were given platform in that unexpected moment. As my children watched me not give up but instead get creative. I cut the combs teeth, broke the handle with my "super mom" strength amazing my children and teaching them once again, not to give up when faced with a challenge. Along with also learning, never spin, twirl or twist a comb in your hair, they also learned of God's faithfulness. God was faithful to answer my plea for wisdom and patience to untangle the unplanned mess my day now set before me. It is God whom establishes our steps. It is He whom holds the final plan on our days and honestly I wouldn't want it any other way. Would you? Who better to have the final say, than the Creator of the Universe!

My prayers are with you... yes you! That we would welcome all that God has planed and not be frustrated when our day does not follow our attempt on planning a day we can not see. A future we do not know. But rather that we trust the one who does.

Here is a story of a little girl named Jessica Joy Rees (link to her Facebook page) and her family who had a BIG unexpected... not with in their plans for life.  On March 3, 2011 Jessica was diagnosed with an inoperable brain tumor. On January 5, 2012 Jessica went home to be with the Lord. I encourage you, if you have not already, spend time seeing how Jessica and her family took the unexpected and allowed God to use it for His glory. I know you will be encouraged and humbled as I have been. My prayers and heart go out to Jessica's family.


P.S. The Rees family attend Saddleback Church in Southern California where her father is one of the Pastors. Also a church I once called home and my parents still do.


Pin It Now!