Tuesday, October 23, 2012

Personalized Bath Towels

Five kids sharing one bathroom means, desperate need for organization! I had been using a color towel system (see here) that was working great, but I wanted something a little more personal and fun. Here is what I came up with. I am just loving how the towels turned out. I also love that my kids are enjoying hanging up their own towels and no one is left guessing whose towel is whose.

 Here is a quick tutorial of what I did. If you are left with questions, please message me, or email me and I will do my best to clarify.
The first thing you want to do is locate your tag. It will need to be on the bottom and the back. Lay your towel down and measure the top part of your towel. My towels had a clear band of stitching, at the top. Just above that, I measured the width and length. I then measured that same width and length for my fabric adding extra for a 1/4inch seam all the way around.
Notice just bellow my fabric is the stitching on the towel. I wanted to place my fabric directly above the stitching.
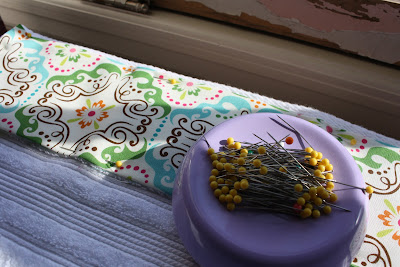
I first pinned and ironed my seam. I did a 1/4inch seam all the way around my fabric. Then I pinned my fabric to my towel.
 Using a straight stitch, I sewed the fabric onto the towel.
Now time for the monogram! I used my word processor to print out the font I wanted for my monogram. It is best to use a bold font.
I used liquid stitch to hold the fabric monogram in place on the towel. I then used an applique stitch on my sewing machine and sewed the monogram onto the towel.
I chose to place my monogram at the opposite, top corner of my towel. That way when the towel wraps around the monogram shows. 


 Because towels need to hang up to dry, I decided they NEEDED an easy hang loop! Here is a quick how I did it picture. 
The loop once pinned on (to the backside of the towel) should measure about 4". I folded my towel in half to find the exact center and pinned it on there. Using a straight stitch I sewed back and forth a few times just to reinforce the loop, since it will be holding the weight of the towel.
Are they not just lovely? It really is a simple project for a great result! Hope you have fun personalizing your towels!


Pin It Now!

Tuesday, October 9, 2012

Now Open!

I am thrilled to announce the start of a new adventure for me! The launch of my new shop Creatively InDePendant in the wonderful market place of etsy! Please come stop by, shop, browse, tell your friends! I would be honored to have you join me!
Just follow the link placed inside Creatively InDePendant and you will land inside my shop! Or click on the "Shop" tab at the top of my blog and that will also guide you right to Creatively InDePendant! While in etsy if you did not follow one of my links, I can be found under the search tool by typing CreativeIndependant.

Come follow me on Facebook! CreativelyInDePendant on FB

Look forward to seeing you!
Pin It Now!

Wednesday, October 3, 2012

Contact Paper Labels


I love labels! I love all those great vinyl labels available today, but the price just soars out of my budget.  Sadly I am not among the fortunate to own a Silhouette vinyl adhesive cutter do-hickey machine.  However, fortunately for me, my creative, frugal juices started flowing and I came up with my own solution for making "vinyl" labels.
Here is a quick tutorial of what I came up with. The labels I used, I created using gimp but the Internet (Pinterest too) is FULL of free printables you could take advantage of. 
I also used this method on other labels that I found out there on Pinterest while searching free printables. I cut these labels up and applied them to gift bags. Makes for a fun personalized way to say, "You are special to me!"
If you don't already, follow me on Pinterest and you can find these labels on my Printables board.
Hope you have fun sticking Contact Paper labels all over your home like I have.


Pin It Now!

Thursday, August 30, 2012

A Steamy Post

It's official! I have fallen in complete and total love! How did I not know how wonderful... how did I not realize when it was right there sitting on my laundry room shelf all these years?

My iron! I am swooning for this "hot" thing. I used to think of it as a steamy chore thing-a-ma-bob that I never used. Why use an iron when a hair dryer or clothes dryer works just fine... duh! Okay so for my wrinkly clothes they still will never be introduced to my new love, but for sewing and crafting HELLO! Love, I tell you! L-O-V-E, love! You know the iron never leaves its perch when your four year old daughter says, "Mom! What's THAT???" when you pull it out. I am happy to report she now knows what an iron is and made the quick connection to a small toy version she saw at Target, "Ohhhhh! That is what I have seen at Target. I always wondered what that was. Can I get one too?"
I am thinking this is a Christmas list must have! After all how can I deny her such love?


Pin It Now!

Wednesday, August 29, 2012

Lampshade Makeover

What do an iron and a lampshade have in common? One very wonderful makeover project!
I bought this lampshade on clearance at Target with the purpose of giving it a makeover. Though it is cute, it is just not quite cute with the decor of my home so it needed a change. Using my iron, I set it on full steam and steamed around the shade. The steam and heat loosen and lift the glue making it possible to separate the fabric from the pieces needing to be reused.
 Here is the first part of the metal frame. In this particular shade there is a bottom frame as well rather than being all in one piece.

 Now that the shade is separated from the frame, it is time to separate the fabric from the shade.
 Using the steam once again iron over your fabric. Begin to lift the fabric from the shade.
Once you have separated the two, you now have a shade ready to be recovered. Lay out your shade face down on top of your fabric to use as a pattern. Cut around your shade leaving enough (but not too much) fabric to be wrapped around the edges of the frame. 
Then with spray adhesive or fabric glue brush on the glue on the wrong side or your fabric. Once your fabric is in place, use your hot glue gun to glue the top part of your frame in place. Once that is done it is now time to glue your bottom frame. After your frame is in place you will need to glue the edges of your frame. Go around the frame with your hot glue gun and wrap the fabric around the frame. 
Now time to "fun" it up with fringe! Don't let that glue gun cool because you will need it yet again to give your new lamp shade some sassy style. Remember the adorable play kitchen remodel? This stylish lamp coordinates with the bottom part of the ruffle. Oh the ear piercing squeals my girls let out, yes they love their new set up as much as I do.
 P.S. The lamp base was a garage sale find that used to be green. It got a fresh coat of black paint along with a new "hat" and I have to say this very inexpensive makeover turned out swell.


Pin It Now!

Monday, August 27, 2012

Play Kitchen Remodel

When my oldest daughter was two she received a wooden play kitchen for Christmas from her grandparents. She was so little she could barely see over the top of the kitchen. Eight years and four more kids later this wooden play kitchen is sill played with and well loved. So well loved that the paint on the burners was chipped and needed refreshing. Why stop there I thought? Why not do a kitchen remodel? That is exactly what I did and boy am I glad I took the time. The adorable factor was kicked way up! It is amazing what a little paint and fabric can do. Now many more fantastic "meals" can be created by my five darling little chefs!


For the knobs I added scrapbook stickers and then sprayed them with Mod Podge sealer.

 I simply hot glued the ruffle onto the kitchen door. I also used my nifty hot glue gun to add the embellishments.  I just love an upgraded kitchen don't you? Simply adorable and perfectly simple to do.


Pin It Now!

Tuesday, July 31, 2012

Rainbow Sherbert Punch

How about a fun, refreshing, sweet summer treat? Sherbert punch will be sure to bring on the smiles.

Here is what you need:

Liter bottle of Sprite (only need about 1/2 or so)
Rainbow Sherbert 
1 Can frozen pink lemonade 
Punch bowl or large bowl
Ladle 

Pour Sprite into your bowl. Then add the frozen lemonade and slightly stir. Add several scoops of the Rainbow Sherbert. Let sit until some of the Sherbert melts in. Then ladle into glasses and enjoy! 
 

Pin It Now!

Wednesday, July 4, 2012

In the Shadow of the Flames

What started out as a fun day at the pool (across town from our house) ended in my kids and I rushing home to grab what possessions we could from our home. The Waldo Canyon fire was approaching our home in Mountain Shadows neighborhood, here in Colorado Springs, Colorado and we were on mandatory evacuation.
At 12:00pm on Saturday June 23,2012 we noticed smoke on a ridge above where our house is located.
Within an hour it was evident the fire was growing rapidly. A short while after that I was on the phone with my husband, who was home and had turned on the news due to smelling smoke. He informed me of the mandatory evacuation but that at this point the fire was still about 4 or 5 miles from our home. Once I had finished packing a bag as if we were heading out for vacation, I stood there totally unsure what I would grab to save from the fire. During this time the police were up and down our cul-de-sac on the bull horn, telling us to get out now. Wedding albums, my running shoes and clothes, all electronic devices... Then just blank. What more could I possibly need then getting out and knowing my precious children, husband and two doggies were safe! After all it is all wood, hay and stubble is what repeated in my mind. Praise the Lord my treasure is not of this earth but in heaven. We loaded the car and then waited out front as we realized our elderly neighbors were still not out. The husband was a bit frazzled as his wife was a bit stressed. We assured them we would not leave with out them. As I was standing in our street the police continued to come down to encourage our speedy evacuation. Knocking on doors and making note of the homes that had been evacuated. One police officer in the course of talking to me said, "You seem like someone who likes to hear it straight." I am I assured him. "I just spoke to the firemen," he began, "This is really big they told me. Where your house is located they will be the first to go. Please do what you can to get your neighbors to leave!" At that time fire trucks began stationing themselves at the entrance to our street. With that our neighbors exited their home and evacuated with us. Now everyone from our street was safely away. Praise the Lord!
From there we checked into the very last pet friendly hotel room in all of Colorado Springs and immediately flipped on the news as we hung on every word. Waiting for when, not so much if, but when the fire was to reach our home. For those of you who watched the Waldo Canyon Fire rage, you know that it took a turn and headed toward Highway 24 threatening more homes that also were then evacuated. Then once again the fire raged back toward our home. We knew that if the fire entered Queens Canyon it was a matter of time before our house was in serious danger. At this point Mountain Shadows was divided, our half of the neighborhood, under mandatory evacuation and the other half, further from the fire only under voluntary evacuation. On Tuesday June 26,2012 the fire did something no human could have expected, planned for or predicted. The fire went against all typical fire behavior and raced, flew, spun and raged. 60 mile an hour winds, fire of 1000 degrees Fahrenheit, Mountain Shadows had no chance to be completely saved from its flames.
As we looked out from our hotel we watched as flames raced down the hill, heading straight for our home. At that point my husband read to us from Ephesians 3:1-14 as we praised the Lord for His unchanging goodness. We settled into the realization our home was lost. The prayers of my children, "Please Lord may our house burn and our neighbors spared." The same prayer that been echoing in our hearts for days.
About 45 minuets later we were notified that our hotel was being evacuated. The Waldo Canyon Fire left many fleeing for their lives and firefighters retreating to a safe place until they could engage again.


Due to the mass devastation of our area and an active fire we were not allowed back into our neighborhood for several days. It was such a strange and difficult experience not to even know for sure if our home had burned to the ground, sustained damage or survived the fire. We waited and waited, still hanging on every word of every news cast, just hoping we may catch a glimpse of our home. Then we saw this map, that only answered for us that our home did not burn to the ground, but what did that mean exactly? Was there water damage, smoke damage, partial destruction? Clearly the fire approached our home.
In the days to come, different evacuated areas were lifted and we tried to get as close to our neighborhood as possible. We were not the only ones from our neighborhood with the same need as I introduced myself to a couple who pulled up next to our car. After trading stories they invited to take us out for ice cream to which we excitedly accepted. What a wonderful treat and blessing!
Then the day came we had been waiting for. The day we got to go and see our homes or lack there of for some. We first drove throughout our neighborhood, gasping and weeping as we surveyed the damage. Homes burned to the ground and others burned on the perimeters. A war zone, our neighborhood looked like a war zone a scene I will not forget. Then we made the drive to our home. Passing first our neighbor across the street whose home, sadly had burned to the ground. It must have been an ember that landed on the roof. Our hearts broke and reality of the devastation continued to hit us hard.

Then we saw the front of our home. My husband went in first to see what damage may be inside. He came out and said there is nothing, the inside is fine. We were shocked! Amazed and completely in awe to find that, yes the fire did approach our home but it did not burn it! Our home no doubt was saved by firefighters! It is evident to us that not only fire hoses were used to save our home but two garden hoses as well.  It is due to the bravery of our firefighters that they SAVED our home! They saved our home! I just kept repeating, that they saved our home. The home that we were convinced was lost was saved. Praise the Lord for His amazing grace!
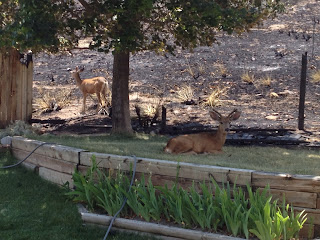
We had a welcome home surprise. We were so excited to see deer laying in our yard Not all wildlife was lost! 
We only were able to stay in our home for a handful of hours due to the evacuation orders still being in effect. A couple days later brought us to yesterday, Tuesday July 3, 2012 the day we got to move back into our home.
This was our welcome home... A double rainbow. A reminder to us that our great, mighty God always keeps His promises.
We are home but our hearts break for neighbors and friends who have lost their homes. Please keep our community of Mountain Shadows in your prayers. We all have a long road ahead of us.
We are so thankful to all who worked tirelessly to protect our community not only from flames but from looters as well. 346 homes as of now have been lost, with the expectation that more may need to be leveled due to heat damage, 34,000 evacuated, two lives lost and a total (as of this date) 18,247 acres burned.  The most destructive fire the state of Colorado has ever experienced. We praise God for His unchanging goodness!

Pin It Now!