Showing posts with label Crafts. Show all posts

Friday, January 11, 2013

Personalized Mugs

Easy and fun are mugs with your own personal spin! With a Sharpie permanent marker an inexpensive mug, or even a plate, some creativity and an oven your project is done in 35 minutes.
Once your mug is designed to your liking (any mistakes can be removed with acetone nail polish remover) then place it on a cookie sheet and pop it in the oven. Bake at 350 degrees for 30 minutes and your design is now a permanent part of your mug.
These make for great gifts. Have your kids decorate their own hot coco mug or a special something for dad or grandparents.
Anyone will love sipping their favorite hot drink in a mug made special for them!
Happy decorating!

Pin It Now!

Thursday, August 30, 2012

A Steamy Post

It's official! I have fallen in complete and total love! How did I not know how wonderful... how did I not realize when it was right there sitting on my laundry room shelf all these years?

My iron! I am swooning for this "hot" thing. I used to think of it as a steamy chore thing-a-ma-bob that I never used. Why use an iron when a hair dryer or clothes dryer works just fine... duh! Okay so for my wrinkly clothes they still will never be introduced to my new love, but for sewing and crafting HELLO! Love, I tell you! L-O-V-E, love! You know the iron never leaves its perch when your four year old daughter says, "Mom! What's THAT???" when you pull it out. I am happy to report she now knows what an iron is and made the quick connection to a small toy version she saw at Target, "Ohhhhh! That is what I have seen at Target. I always wondered what that was. Can I get one too?"
I am thinking this is a Christmas list must have! After all how can I deny her such love?


Pin It Now!

Wednesday, August 29, 2012

Lampshade Makeover

What do an iron and a lampshade have in common? One very wonderful makeover project!
I bought this lampshade on clearance at Target with the purpose of giving it a makeover. Though it is cute, it is just not quite cute with the decor of my home so it needed a change. Using my iron, I set it on full steam and steamed around the shade. The steam and heat loosen and lift the glue making it possible to separate the fabric from the pieces needing to be reused.
 Here is the first part of the metal frame. In this particular shade there is a bottom frame as well rather than being all in one piece.

 Now that the shade is separated from the frame, it is time to separate the fabric from the shade.
 Using the steam once again iron over your fabric. Begin to lift the fabric from the shade.
Once you have separated the two, you now have a shade ready to be recovered. Lay out your shade face down on top of your fabric to use as a pattern. Cut around your shade leaving enough (but not too much) fabric to be wrapped around the edges of the frame. 
Then with spray adhesive or fabric glue brush on the glue on the wrong side or your fabric. Once your fabric is in place, use your hot glue gun to glue the top part of your frame in place. Once that is done it is now time to glue your bottom frame. After your frame is in place you will need to glue the edges of your frame. Go around the frame with your hot glue gun and wrap the fabric around the frame. 
Now time to "fun" it up with fringe! Don't let that glue gun cool because you will need it yet again to give your new lamp shade some sassy style. Remember the adorable play kitchen remodel? This stylish lamp coordinates with the bottom part of the ruffle. Oh the ear piercing squeals my girls let out, yes they love their new set up as much as I do.
 P.S. The lamp base was a garage sale find that used to be green. It got a fresh coat of black paint along with a new "hat" and I have to say this very inexpensive makeover turned out swell.


Pin It Now!

Wednesday, May 30, 2012

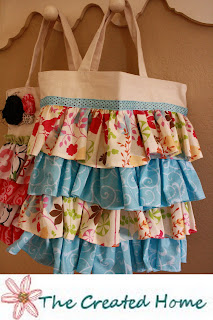
Ruffle Tote Bags

I love ruffles! I do! They just make me giddy like a little girl. So how perfect are ruffles on a plain, boring tote bag? I made these ruffled tote bags for my nieces and just adore how darling they turned out. My four girls fell in love with these ruffled bags as well and have placed their orders... Oh my lots of ruffles in store for me!

For these bags I began with a ready made tote bag that can be purchased at Hobby Lobby or for a tad cheaper at Walmart. Walmart has a package of 3 totes for under $6.00, that is a great deal.

Supplies:
Tote bag
1/4- 1/2 yard each of 2 coordinating fabrics for the ruffles (I always get extra fabric so I chose to go with 1/2 yd. each.)
Ribbon
Fabric for flowers,  if doing fabric flowers
Thread
 There are many different ways to sew a ruffle. I do NOT claim to be a ruffle expert, just a ruffle admirer.  Here is how I chose to sew the ruffles for my bags.
 Lay out your ruffles first to find out where you want them before you begin to sew.
 Once the front of your bag is finished with all it's beautiful ruffles, it is time to finish off the back.
 There are two different looks for your bag. The first option takes the ruffle almost to the top of the bag and  does not leave room for flowers. The second option does leave room at the top to add fabric flowers. I think both are super cute. Just depends on what you prefer.


Pin It Now!

Thursday, January 12, 2012

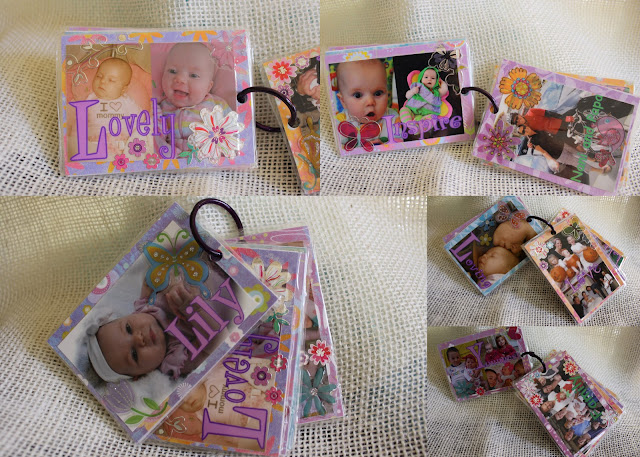
Photo Flip Books


Kids and photo lovers will just flip over theses Photo Flip Books! Every child I have ever met all around the world, LOVES to look at pictures of themselves and people they love. These little books can either be something a child holds onto or is placed on a bag. How about Grandma? Maybe she needs a little Grandma brag book she can attach to her knitting bag or her gym bag because not all Grandmas knit. :) What a great gift for the mom who has a diaper bag! These little books make for a fun addition to a Library book bag as well. More ideas: Play purse, ballet bag, backpack, karate bag, sleep over bag, swim lesson bag and so on.


 How to create these fun Photo Flip Books:

Edit the photos of your choice.
I created my collages using Picasa 3. In collage settings you need to create a custom ratio for 2.5 x 3.5 (wallet size). Even if you are using a single picture, create it in collage so it can be set at wallet size. Add the text you desire. You can go with a theme or as I did, spell out the child's name in an acronym.
B- beautiful    E- energetic    T- thoughtful    H- happy    Beth
Have your photos printed. I used Costco wallet size prints.
Supplies needed:
Card stock scrapbook paper (one paper per photo)
Stickers (I used scrapbook stickers)
Scrapbook sticky tape tabs (to attach photo to card stock)
Glue stick
Hole punch
Book rings
Books will need to be laminated. You can pay to have them done at Staples. If you do then make sure to tell them NOT to cut too close to the card stock paper edge. You want a good seal.Or you can laminate them yourself.
 Attach each photo to it's own card stock. Then glue the two pieces of card stock together.
For these cards I chose to spell out the child's name front and back. On one side I have a cover page with the child's name. On the reverse or back side of that page is the last letter of the child's name. This is the case if you are spelling out the name two times. The other option is to spell out the name on the front and then on the back side add photos with fun or special sayings.

Again, just to be extra clear... on one side the name is spelled from cover page to last letter in the name. On the reverse is last letter of the name to the cover page. So that once the cards are on the ring both ends have a cover page. This is only if you choose to spell out the name twice.

The second way is to spell out the name on one side and on its reverse side, photos with the words of your choice.
Hint: If you want to make a photo book for someone, but you don't have photos of them, but you are Facebook friends you can thief the pictures. If using an Apple device such as iPhone, iPad or iTouch you can click on the photo and select save. If working from another device, click on the photo and select download.
For these three photo books I used some of the same photos for the reverse side of the name side. Two last helpful tips: Make sure all your photos are going the same direction, for the front photo as well as the back photo. You can see example of that in some of the above pictures.  That way you have one top for the hole. I punched the hole once the card was laminated.

If you make these fun Photo Flip Books I would love to see what you create! Send me an email thecreatedhome@gmail.com



Pin It Now!

Wednesday, September 21, 2011

A Little Something Painted


I confess I love painting! I love taking an object and seeing what I come up with. Here are a few things I have painted for my girls' rooms.  (The frames can be found at Jo Ann Fabric. They are scrapbook size.)

 These book ends were in the clearance section at Hobby Lobby. They were a black, white and pink zebra pattern. I really liked the $1.36 clearance price, but they were not the color or theme I wanted. Paint! Lovely, wonderful paint... oh how I love thee!

Okay I know... I really NEED to get pictures in them! I am not even going to tell you just how long they have sat empty.

 This was also in the clearance section and formerly matched the book ends.
From this... to these...


So keep your eye out!  Something inexpensive slathered with a bit of paint, can turn  into exactly what you desire!


Pin It Now!