Howdy! Here it is, my sweet daughter and darling baby boy's bedroom!
My amazing mom made all of the bedding! Bed skirt and all! She is so talented and she is my MOM! I am just in love with how it turned out!
I will be adding more pillows. As for a head board... well this works for now.
For the blank wall I have a few ideas or it just may remain bare. Still deciding on that one.
Horse Sheets just complete the look for my horse loving daughter! Notice the Ric Rac on the curtains? Love the added touch it brings to the room.
Welcome home pictures from my youngest daughters to their baby brother! So sweet!
My God fearing husband is the Senior Pastor of our church. After having our son, I was unable to attend church one Sunday morning. My older daughters went to church with daddy. As daddy was preaching my daughter drew this portrait of him. She said, "this is what you look like on the inside daddy!" She was so proud of how fun her daddy is! Now her picture is displayed on her very own memo board in her new room!
A boy girl room made with LOVE! You can check out my other posts about this room here.
A wall so "blue" :( nothing on it to make it shine like a star.
Okay I know I am a goof ball. But I sure do entertain myself!
This is the wall above my son's crib. Plain and boring and needing this...
Do you see my sweet little guy in his crib? He was so excited to see the transformation of a boring blue wall adorned with stars sparkling forth his name. Okay he slept through the whole ordeal... thank goodness or I would have never finished this project.
In my previous post I shared with you how I used Mod Podge and Scrapbook paper to cover his wooden letters for his name. I decided to brighten things up (you laugh here) and add painted stars under the letters. This is a shining example of how a little paint can make a big difference.
Here is what I did...
I searched the internet for a star template I could print out. Printed it on card stock and cut it out.
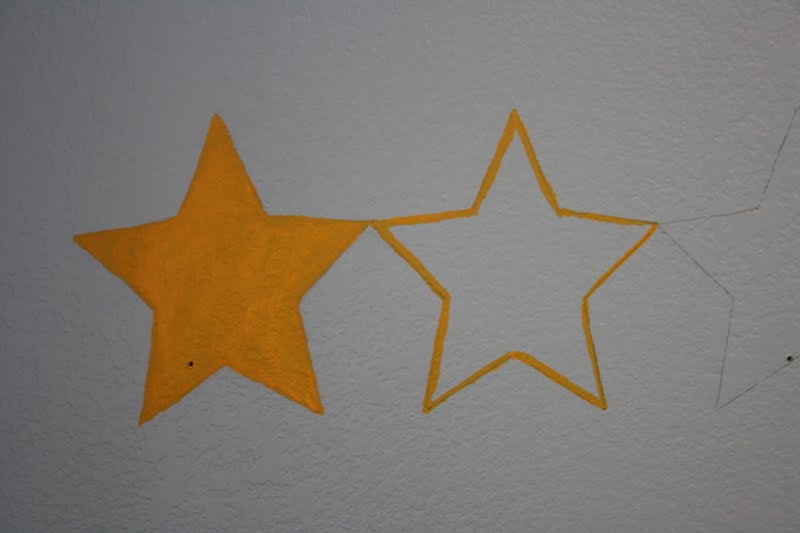
I traced the stars on the wall using a pencil.
I had to use three coats of paint to get the star to really cover over the blue paint. Painting the star white first would have been a bright idea. I used Acrylic paint... same paint I use for my wood projects. Can be purchased at any craft store.
I give this project five stars!
I just love the way it turned out!
These are the picture hangers I attached to the back of each letter. I bought them at Lowe's for $1.94 for a package of six. On the letter "N" I used two so it would hang straight. These are so great, you just hammer them in, rather than hammering in a little nail to hold it in place.
And to think, I did all of this while still in my pajamas! Pin It Now!
Wooden craft letters crafted! There are so many things you can do to make over a wooden letter. In the past I have painted wooden letters by hand. See here for my previous post. This time around I covered the letters in scrapbook paper. Here is what I did.
You can buy these letters at Hobby Lobby or any other craft store. I waited to buy mine at Hobby Lobby when they were 50% off.
First, I painted the letter using an acrylic paint. I choose a color that to coordinate with the main color of the scrapbook paper I was using. You could use white for every letter if you prefer. The part that matters most for the paint are the sides since that is the only part that will show.
I then placed my letter on the paper and traced around it. You could turn your paper over, turn you letter over and trace it that way if you prefer. Same result.
Once your letter is cut out you are ready to glue it on using Mod Podge.
Mod Podge can be found at your craft store, I bought mine at Hobby Lobby.
You will use this to first paint your letter. Stick your
paper on your letter and then paint over it using nice even strokes with the Mod Podge. There are different finishes of Mod Podge, I choose to use the shiny kind.
You may have parts where the paper sticks out over the edge of the letter. Once dry, I used a bit of sandpaper to flatten the paper to the edge of the letter. Sand in one direction so you don't rip the paper.
For my letter A I used each paper used in my son''s name.
What I did...
Lay the paper you want on the part of the letter you want it. Trace around it and cut it out. At times you will need to hold the paper in place on the front, turn it over to trace on the back. Figure out what piece needs to be Mod Podged first.Once all the peices of your "puzzle" are in place paint the front with your Mod Podge.
To make it a bit more fun I added a horse charm for my horse loving daughter.
Using the help of the internet and Word I made very inexpensive art work.
I painted frames I already had, used scrapbook paper, printed out the pictures I wanted and viola!
Again backed with scrapbook paper I made a collage.
I painted this frame red, black and blue... it came out rather well for the look I wanted. Considering it used to be an unattractive laminate brown frame.
Word! Don't you just love what you can create using Word? To personalize these prints I added to the one on the left, Cowgirl and my daughter's name. To the one on the right I added my son's name to the top and bottom. To think I could have bought these prints on canvas for over a hundred dollars each! I am quite content with my print out version.
A thrift store frame that used to be natural wood... brown. Getting the idea... yup another print out backed with scrapbook paper.
What used to be an ugly green frame got a coat of black paint and topped with a coordinating ribbon. I love my hot glue gun!
Here is before adding some additional art work.
After. For being on a budget it came out fun!
My horse loving cowgirl is very pleased so that is all that matters! I did not need to spend hundreds of dollars on art work to make her smile and feel loved! Pin It Now!
Online I found a memo board that would match my Vintage Western boy/girl room/nursery for $100! That was $91 more than what I ended up paying by making my own.
I found two magnetic cork boards on clearance at Hobby Lobby for $2.00 each. Magnetic so cool, since this is going in a child's room I don't want push pins.
I cut my fabric so it would wrap around the board leaving enough to hot glue on the back. I used straight pins to hold the fabric in place at each corner.
I used a hot glue gun to attach the fabric to the board. I then chose to use a see through ribbon so it would not distract from my patterned fabric. I again used straight pins to hold the ribbon in the place I wanted it. Using my hot glue gun, I glued the ribbon at the back of the board.
I chose to do two Xs with my ribbon (a total of four cut ribbons) but you could use six ribbons to make more Xs.
I then choose two buttons from my button jar. I keep this jar in my laundry room to catch any lost or extra buttons. (Click here to see my laundry room makeover)
I sewed them on using strong thread since little hands will be pulling at the ribbons to add their art work or pictures.
I stitched the button thread to the fabric so I could tie it off. I pulled it tight to keep the button firmly in place.
I made two memo boards. One using my son's fabric and one using my daughter's fabric.
Again I used a see through sheer ribbon so the pattern was not hidden.
I just love these fabrics for my boy/girl bedroom. The memo boards turned out super cute for only spending $9.00!
Here is the pillow sham for my daughter's bed. I am so excited! My mom is custom making all her bedding! As soon as the bedding is complete I will do a full room reveal.
Click here for my previous posts for this room.