A friend of mine asked me what I have planed for Valentine's Day for my girls? I have not the foggiest idea! No problem, I still have a couple of days to figure it out. Smile, smile! What I do know is what I have done for my girls in the past.
Here is something I did for each of my girls to show my love and how special they are to me.
The girl's letters hang over their beds. I told my girls that every time they climb into bed at night and see their letter they can know how much mommy loves them! How very special they are to me! The years have passed and still my girls treasure their letters. They are already reminding me we need to make one for our new baby! Just touches my heart that this simple act conveys so much love to my children.
This polka dotted letter C is going to be redone since a new room awaits my now three year old with a different color scheme.
I bought these letters at Hobby Lobby and after painting them added a picture hanger to the back so they could hang on their walls. Just make sure you do not hammer the nail through to the front of the letter. Not that I would know from experience.
Now time for me to get creative for this year's Valentine's Day! Pin It Now!
We all have to learn them so why not make it fun? Learning our letters does not have to be boring it can be better than that it can be the best fun!
Here is a sample of the fun we have at school with letters. First I decide on a letter for the week. I print out something like you see pictured here. We talk about the sound the letter makes, read the words, they think of some on their own and then... they run! They run around the house/ classroom finding things that start with the letter of the week. In this case the letter B!
Other times we bring something to share that starts with our letter of the week. Snack, lunch, dessert, craft and so on can go right along with the letter of the week.
They placed the items they found for the letter Bb in my basket. Then I pulled out what they found and we talked about why or how it fit with the letter.
They found:
Bear
Ballet slippers
Bowling Ball
Blue Ballerina
Baby Bottle
Blue Elephant with a Bird
Blanket
We then sang songs and read poems about Bumblebees! So for our craft, what else but Bumblebees! I love that the wings for the Bees are their hand prints!
We are BUZY Bees around our home school classroom! I hope you join in the BEST fun and try these fun learning letter ideas with your little ones! You will see the BIGGEST smile appear on their beautiful faces!
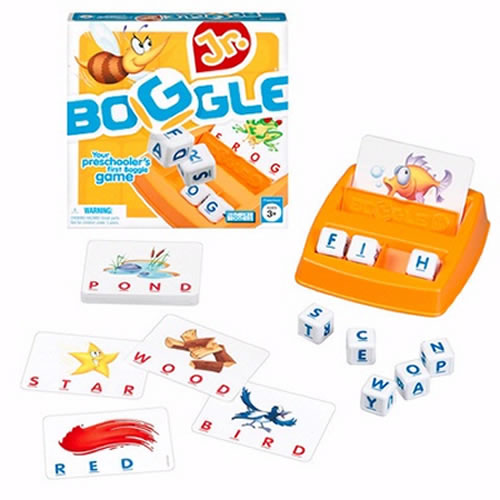
As a mom and a teacher to my children I am always on the look out for fun ways to get my kids excited about learning. I came across this game when my first daughter was three and found it to accomplish just what I was hoping for. I have put it into use with all my other children and they too enjoy it just as much as she did years ago. I hope you find this to be as fun, educational and useful for your children as I have.
Boggle Jr. is a great way to get your little ones excited about reading. This game is fun for little hands and minds to search for and match the letters in the word displayed. Helps to reinforce letter recognition and letter sounds. Also a great tool for children learning their short vowel sounds.
A very simple way to have craft or school supplies organized and ready to use.
I found the buckets at Target in the dollar section. I am sure craft stores would have something similar. I then bought a letter stencil to paint pen the words on the buckets. The lazy Susan I purchased from Target in the home organization section. This one is intended for use inside a kitchen cupboard. In the middle of the lazy Susan, holding the pencils is a small bottle, I think it formerly held vitamins. I tore the label off and stuck the bottle to the lazy Susan. The buckets are not attached.
I have seen a similar item pictured in the pages of Pottery Barn Kids, but the cost for the one they sell is more than what I paid to put this one together. I also had fun doing it!
The buckets I have here read:
Crayons
Scissors
Glue
Supplies
Finger painting is fun, plain and simple! Finger painting that you can lick your fingers and sample your art is even better! In the past we have used shaving cream, so I thought why not whip cream? What a thought! My girls had so much fun and really enjoyed the sweet treats that came along with "painting" no doubt about that!
All you need is:
Whip Cream
Food Coloring
Bowls
Wax Paper
Masking Tape or Painters Tape
Pretzels
Marshmallows
or Anything else you come up with!
I just taped a piece of wax paper to the table put globs of the whip cream on each paper and let the girl's imaginations soar! It was a great deal of fun watching how each one approached what was set before them. To see how each child created something totally different!
You can also use yogurt or pudding. Choosing vanilla would allow you to use food color or find yogurt/ pudding that is already flavored and colored.
You can really see the different personalities displayed! Such fun! Just wash in warm water and soap to rid their little hands of the oil in the Whip Cream. Pin It Now!
A room fit for a princess! My sweet princess Hailey Grace who happens to be my first born. In just a matter of days she will be celebrating her ninth Birthday. Gasp! I can hardly believe how quick time is going by! How grown up she is becoming.
When asked what she would like for her Birthday, not a single toy, doll, stuffed animal or anything falling in a similar category was mentioned. Gasp! Gasp again! What she wanted was new bedding! Something green, since as the years pass her love for the color is growing.
We searched the Internet for ideas and when we came across the below bedding (found at Pottery Barn Kids) she lit up and was instantly in love! To see the excitement on her face and hear the joy in her voice, I was SOLD! A call went into Grandma, who wanted to be the bearer of this wonderful gift and the purchase was made!
First, more of a look around the room.
Hailey Grace at age 7... once excited about the bedding pictured here.
A very happy Hailey Grace approaching age 9!
Now a future project, extra pillows and pizazz added to her bed! Oh how I love to keep myself busy with my "Hopes and To Do" list as I call it.
The sheets are polka dots and the duvet is paisley! Could there be a better combination! Super cute!
Such a loving, sweet big sister Hailey Grace is... she is having Christiana Hope spend the night with her! Intentionally there is not a picture of Grace sleeping... out of respect for her private personality!
I found this accordion hook at a thrift store for $.99 and what a steal of deal it turned out to be. I have been a fan of these fun hooks for awhile now. I saw one featured in The Land of Nod catalog awhile back and just was not willing to pay the price they wanted.
Amazing what a little paint can do to a not so attractive item. Here is how this accordion hook was transformed. According to me, a definite improvement was made
First I painted the hook white to act like a primer, covering that not so beautiful dark wood stain.
Then I painted it red in a water wash. Dipped my brush in water and then in the red paint. I wanted some of the white to show through just a tad.
I then painted the pegs a solid red. The same red as before, just not washed down.
I cut out a star template from card stock. Traced around my star, rotating the star each time. The star was then painted a light blue.
I wanted the star to wrap around just a bit. I did one coat of blue so some of the red would show through. Keeping the wash effect consistent.
I painted the tops of the pegs the same light blue. I decided to do half stars and half just red. Sometimes less is just best. So as you can see the top pieces of wood are stars and the underneath are red. According to me, this could not have been easier for a fun result!