Monday, June 20, 2011

Adding A Bit of Ric Rac

A very simple addition to curtains really brings up the fun aspect! In this case adding a bit of Ric Rac to a pair of denim curtains brought about that bit of something extra  I was looking for. As well as adding some red to help break up a whole lot of blue.


 This is the part when I get to the how I did it. CAUTION... for any of you who are great sewers or posses amazing talents, this is not for you. Just scroll on down. Mom that includes you!!!

I thought about sewing on the Ric Rac and then I got wise! Do I want this very simple addition to turn into a two day project? So instead I got out my handy dandy hot glue gun.
Tuning my glue gun on low, I simply put my glue along the edge of the curtain and glued the Ric Rac right where I wanted it. SIMPLE!

Oh wait remember how simple this project was supposed to be? Well my little guy decided to add some extra effort to it by fussing at me. My solution stick him on the stroller next to me. Then each of my girls took a turn pushing him around (the only time I condone pushing in our family) to keep him content. For me this project took a bit of extra time, but for you minus the fussy baby it will be a matter of minutes!


Just a peak... here are the curtains hung in my daughter and baby boy's room. Soon the whole room will be revealed! Remember we are just waiting on my daughter's custom made bedding from my amazing mom! 


A very simple addition really added some extra fun to the room!



Pin It Now!

Saturday, June 11, 2011

A Star is Born

A wall so "blue" :(  nothing on it to make it shine like a star.
Okay I know I am a goof ball. But I sure do entertain myself!
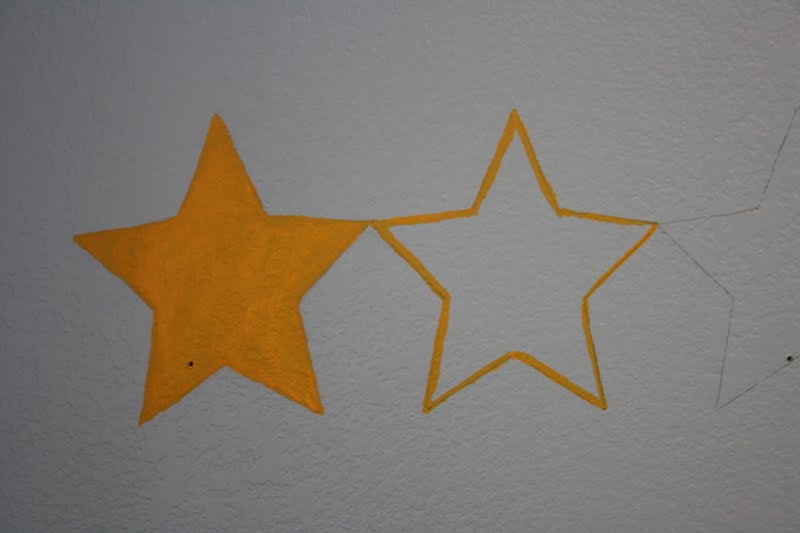
This is the wall above my son's crib. Plain and boring and needing this...


Do you see my sweet little guy in his crib? He was so excited to see the transformation of a boring blue wall adorned with stars sparkling forth his name. Okay he slept through the whole ordeal... thank goodness or I would have never finished this project.
In my previous post I shared with you how I used Mod Podge and Scrapbook paper to cover his wooden letters for his name. I decided to brighten things up (you laugh here) and add painted stars under the letters. This is a shining example of how a little paint can make a big difference.
Here is what I did...
 I searched the internet for a star template I could print out. Printed it on card stock and cut it out.
 I traced the stars on the wall using a pencil.


I had to use three coats of paint to get the star to really cover over the blue paint. Painting the star white first would have been a bright idea. I used Acrylic paint... same paint I use for my wood projects. Can be purchased at any craft store.


I give this project five stars!


 I just love the way it turned out!

These are the picture hangers I attached to the back of each letter. I bought them at Lowe's for $1.94 for a package of six. On the letter "N" I used two so it would hang straight. These are so great, you just hammer them in, rather than hammering in a little nail to hold it in place.

And to think, I did all of this while still in my pajamas!

Pin It Now!

Wednesday, June 8, 2011

Wooden Letters


Wooden craft letters crafted! There are so many things you can do to make over a wooden letter. In the past I have painted wooden letters by hand. See here  for my previous post. This time around I covered the letters in scrapbook paper. Here is what I did.
You can buy these letters at Hobby Lobby or any other craft store. I waited to buy mine at Hobby Lobby when they were 50% off.


First,  I  painted the letter using an acrylic paint. I choose a color that to coordinate with the main color of the scrapbook paper I was using. You could use white for every letter if you prefer. The part that matters most for the paint are the sides since that is the only part that will show.
I then placed my letter on the paper and traced around it. You could turn your paper over, turn you letter over and trace it that way if you prefer. Same result.


 Once your letter is cut out you are ready to glue it on using Mod Podge.
Mod Podge can be found at your craft store, I bought mine at Hobby Lobby.
  
You will use this to first paint your letter. Stick your
paper on your letter and then paint over it using nice even strokes with the Mod Podge. There are different finishes of Mod Podge, I choose to use the shiny kind.


You may have parts where the paper sticks out over the edge of the letter. Once dry, I used a bit of sandpaper to flatten the paper to the edge of the letter. Sand in one direction so you don't rip the paper.

For my letter A I used each paper used in my son''s name.
What I did...
Lay the paper you want on the part of the letter you want it. Trace around it and cut it out. At times you will need to hold the paper in place on the front, turn it over to trace on the back. Figure out what piece needs to be Mod Podged first.Once all the peices of your "puzzle" are in place paint the front with your Mod Podge.

To make it a bit more fun I added a horse charm for my horse loving daughter.


Pin It Now!

Tuesday, June 7, 2011

A "Word" on Homemade Art

Using the help of the internet and Word I made very inexpensive art work.
I painted frames I already had, used scrapbook paper, printed out the pictures I wanted and viola!


Again backed with scrapbook paper I made a collage.


I painted this frame red, black and blue... it came out rather well for the look I wanted. Considering it used to be an unattractive laminate brown frame.


Word! Don't you just love what you can create using Word? To personalize these prints I added to the one on the left, Cowgirl and my daughter's name. To the one on the right I added my son's name to the top and bottom. To think I could have bought these prints on canvas for over a hundred dollars each! I am quite content with my print out version.


A thrift store frame that used to be natural wood... brown. Getting the idea... yup another print out backed with scrapbook paper.


What used to be an ugly green frame got a coat of black paint and topped with a coordinating ribbon. I love my hot glue gun!


Here is before adding some additional art work.


After. For being on a budget it came out fun!


My horse loving cowgirl is very pleased so that is all that matters! I did not need to spend hundreds of dollars on art work to make her smile and feel loved!

Pin It Now!

Sunday, June 5, 2011

Memo Boards

Online I found a memo board that would match my Vintage Western boy/girl room/nursery for $100! That was $91 more than what I ended up paying by making my own.
 I found two magnetic cork boards on clearance at Hobby Lobby for $2.00 each. Magnetic so cool, since this is going in a child's room I don't want push pins.   
 I cut my fabric so it would wrap around the board leaving enough to hot glue on the back. I used straight pins to hold the fabric in place at each corner.

I used a hot glue gun to attach the fabric to the board. I then chose to use a see through ribbon so it would not distract from my patterned fabric. I again used straight pins to hold the ribbon in the place I wanted it. Using my hot glue gun, I glued the ribbon at the back of the board.

 I chose to do two Xs with my ribbon (a total of four cut ribbons) but you could use six ribbons to make more Xs.
 I then choose two buttons from my button jar. I keep this jar in my laundry room to catch any lost or extra buttons. (Click here to see my laundry room makeover)
I sewed them on using strong thread since little hands will be pulling at the ribbons to add their art work or pictures.


I stitched the button thread to the fabric so I could tie it off. I pulled it tight to keep the button firmly in place. 

I made two memo boards. One using my son's fabric and one using my daughter's fabric. 
Again I used a see through sheer ribbon so the pattern was not hidden.


I just love these fabrics for my boy/girl bedroom. The memo boards turned out super cute for only spending $9.00!


Here is the pillow sham for my daughter's bed. I am so excited! My mom is custom making all her bedding! As soon as the bedding is complete I will do a full room reveal.
Click here for my previous posts for this room.


Pin It Now!

Wednesday, May 25, 2011

Orange Day

Knock, knock... whose there... Orange
Knock, knock... whose there... Banana
Orange you glad I didn't say Orange?

Kids love to have fun!
Here is another fun way to get kids to eat their food, learn their colors and learn the letters that make up a word. A simple paper plate becomes a platform for learning. By simply writing on the paper plate takes something ordinary to extraordinarily fun. My kids really enjoyed coming to the table to this meal... not because of the food on the plate, but rather the fun way it was on the plate. I love seeing smiles on my kids faces and this simple gesture did just that! We also had a lot of  fun talking about things that are orange in the world around us. The kids enjoyed spelling out the word on their plate and for the little ones recognizing the different letters was great.
O-R-A-N-G-E! Orange you glad kids love to learn!


Pin It Now!

Tuesday, May 24, 2011

Persistence of a Mother's Instinct

On May 7, 2011 at 3:02 AM our baby boy Nolan Ryan was born. He was induced four weeks before his due date due to his dropping in size. My sweet little guy went from the 35th percentile to three weeks later to the 12th percentile to another three weeks to below the 10th percentile in growth. Dropping below the 10th is dangerous and inducing was the best route to take. Upon his birth the Dr. realized the cord was wrapped around his neck twice, causing an urgency to get him out! Once he was out the Dr. then discovered he had a true knot in his cord. The Dr. made it very clear to me that if he was not taken that day, he would not have survived! What an amazingly gracious God we serve!
The day before his birth, the same day my induction began, I had an ultrasound appointment. The ultrasound was to check the baby's growth. However the tech told me it was not a measurement ultrasound but rather a Doppler to check fluid. I became very persistent that she do the measurement. After much convincing and my not backing down, the tech made an executive decision to do what I was asking. In the end she was very glad she did. In the end the persistence of a mother's instinct that something was not right, saved my baby's life. May this encourage you that God has given us instincts as parents and it is beneficial to listen to them. No matter what a Dr. or nurse or any other voice around us tells us, no one knows like a parent. I am so humbled that I did follow my instinct and now I have my baby in my arms because of it. God's grace humbles me!
 Nolan spent 8 days in the NICU. He is home now and is growing strong! His lowest weight was 4LBS and today he is 4LBS 11OZ! We celebrate every ounce of our little gift!

Pin It Now!