On May 7, 2011 at 3:02 AM our baby boy Nolan Ryan was born. He was induced four weeks before his due date due to his dropping in size. My sweet little guy went from the 35th percentile to three weeks later to the 12th percentile to another three weeks to below the 10th percentile in growth. Dropping below the 10th is dangerous and inducing was the best route to take. Upon his birth the Dr. realized the cord was wrapped around his neck twice, causing an urgency to get him out! Once he was out the Dr. then discovered he had a true knot in his cord. The Dr. made it very clear to me that if he was not taken that day, he would not have survived! What an amazingly gracious God we serve!
The day before his birth, the same day my induction began, I had an ultrasound appointment. The ultrasound was to check the baby's growth. However the tech told me it was not a measurement ultrasound but rather a Doppler to check fluid. I became very persistent that she do the measurement. After much convincing and my not backing down, the tech made an executive decision to do what I was asking. In the end she was very glad she did. In the end the persistence of a mother's instinct that something was not right, saved my baby's life. May this encourage you that God has given us instincts as parents and it is beneficial to listen to them. No matter what a Dr. or nurse or any other voice around us tells us, no one knows like a parent. I am so humbled that I did follow my instinct and now I have my baby in my arms because of it. God's grace humbles me!
Nolan spent 8 days in the NICU. He is home now and is growing strong! His lowest weight was 4LBS and today he is 4LBS 11OZ! We celebrate every ounce of our little gift! Pin It Now!
The bedroom we had our classroom in is now being transformed into just that, a bedroom. My next best location, the family room. I had my reservations with having a classroom in the main part of the house, but with a baby on the way, it seems to be the best place for it. School can keep going on even while baby has a need for me to attend to. Here is the beginning of our new classroom as we know it. I still have a few details to attend to, but for now it is working out just great.
It is so wonderful having a chalk board!
The kids love drawing on it! I love that they also use it to practice what they learned that day in school. From math problems to handwriting, a chalk board is a great tool!I placed a stool at the chalkboard for the extra "short" students in our family.
Another great tool is the framed burlap board (pictured to the right of the chalk board) to display flannel board pieces.
.
Underneath my apple cabinet (pictured there next to the large computer cabinet) I have a Finished Work Box. My kids love getting to stamp their pages for a job well done before placing their completed work in the box.
Here is a look inside my classroom closet. On the wall I used picture hanging wire to display art work. The pages are hung using clothespins.
The closet not only stores all my supplies, it serves as a learning center as well.
The Dry Erase board is a tool I use. From a list of the day's plans, the weeks Bible verse, vocabulary words, to quick thoughts... I love it! Anything I write on the chalk board most likely will be colored over or erased by one of my sweet darlings. This Dry Erase board is safe from little hands!
To save on space, I store my books in plastic bins. I select books each week and place them in a separate basket for easy access for my kids.
The basket is also easy for the kids to place books back where they belong.
Another very loved tool in our classroom is our easel! I placed a child size chair in front of it and my kids love standing or sitting while they draw. Whether we are doing school or the kids are just enjoying the classroom, having a place where learning and creativity never ends is fabulous!
Family room meet classroom is working out MARVELOUS! I truly think this is our best location yet!
I decided my Lazy Susan Craft Buckets needed a little something extra. All I did was hot glue ribbon around the lazy Susan as well as the center bottle that holds pencils. Since my craft buckets are not attached to the lazy Susan I wanted the center bottle to look nice when the buckets are removed.
I used adhesive Velcro to stick the bottle to the lazy Susan.
For any of you looking for a wonderful and fun way to teach your little ones Bible stories, The Rhyme Bible is great! I came across this years ago when I was a nanny as well a a new believer. This adorable Bible in rhyme not only captivated and taught the little ones I was caring for, I myself learned a great deal.
I have since shared it with my own children as well as putting it to use in our Sunday school. Every kid loves rhymes... every kid I have shared this with loves it!
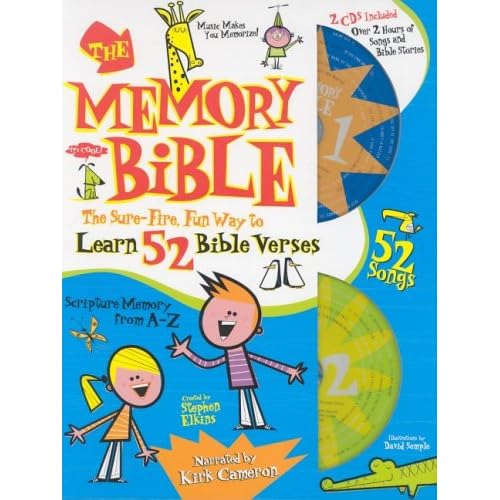
Another fabulous tool we use to memorize scripture is The Memory Bible by Stephen Elkins and narrated by Kirk Cameron. The Bible tells us to hide God's word in our hearts that we might not sin against Him. This Fun way of hiding God's word in the hearts of your children will have them eternally blessed.
A fun way we use this book is to read the verse, read the story and then take turns reciting the verse we just learned. I have the child say the verse in a normal voice, then we say it LOUD and then in a whisper. The kids love getting to shout out the verse! No child is too small to participate. I have begun this before my child could even speak clearly. They loved just making noise and all of us cheering at their attempt. Make a joyful noise unto the Lord! Click here to take a look inside the book.
Sunset.com Photo by Megan Thompson; courtesy of MyHomeIdeas.com
I am on the search for creative ideas for a twin headboard. May I also add inexpensive ideas for a twin headboard.
I am still in process of putting together my daughter and baby boy's room. One thing I am lacking is a bed frame or headboard for my daughter's bed. I thought it would be fun to be creative with coming up with a headboard for her instead of buying a whole bed frame. Later on in years when the two no longer are roomies, I may want this bedroom to have a full size bed and not spend the money on a temporary need for a twin bed now. My original thought has been to make an upholstered headboard, but we will see if my search yields any other creative solutions.
These photos are some of the things I have come across.
Sunset.com Photo by Deborah Whitlaw Llewellyn; courtesy of MyHomeIdeas.com
I love the rustic boards used as a headboard and what they did with the wall space. Also the frame bed, simply made from molding purchased at the hardware store and painted. I am thinking the middle of the frame can be either paint or fabric.
Some other ideas I came across were using shutters, or picket fence. Maybe even using shelves or cork board. There are a lot of really great ideas out there. Now I just have to decide what direction I want to go.
Here is a link to another really great sight for ideas. curbly.com Pin It Now!
Here is what became of my painted baskets. One of them will hold diapers and such for baby. Just a small peak into my still in progress Horse Theme boy/ girl bedroom.You can check out previous posts here Boy/ Girl Bedroom.
He Is Risen! Though the letters have been loved off, at one point this cross did read those marvelous words of truth!
Here is a fun Easter craft you could do with your kids or if you teach Sunday school, the kids in your class. I came up with this last Easter and had my kids and Sunday school kids do this and they really enjoyed it. This does not have to be limited to just Easter. Change the colors and the choice of words and you have a great craft for anytime.
The supplies you will need:
Sparkle foam "paper" found at any craft store. I found mine at Hobby Lobby.
Hole Punch
Ribbon (I used wrapping ribbon)
A Cross Template to cut out the Cross shape. You could draw it or download something from the Internet.
Different Colors of Tissue Paper
Contact Paper
Foam Letters
Ribbon to hang the Cross in a window How To:
Fold your sparkle foam paper in half. Place your Cross template in the center and trace around it. Cut out the Cross.
Punch holes around the edges. Punch two holes at the top to hang the cross in a window. Cut tissue paper into square pieces.
To make the stained glass center you will need to fold a piece of contact paper in half to fit the inside of the sparkle foam. Then cut the contact paper to fit.
Peel away half of the contact paper. Have the kids lay the different color tissue paper on the sticky side of the contact paper just over the cross shape. You need the edges free so the contact paper can stick to its self. Peel the rest of the contatct paper off and stick them together.
Then have the kids sew the wrapping ribbon through the holes, attaching the three pieces (foam, contact paper and foam) together. Tie a ribbon at the top two holes for hanging.
Have the kids add the words of your choice to the sparkle foam. My choice since this was an Easter craft, He Is Risen!