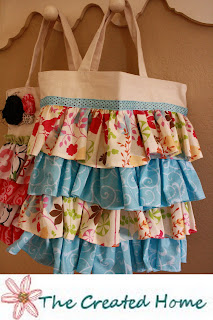
I love ruffles! I do! They just make me giddy like a little girl. So how perfect are ruffles on a plain, boring tote bag? I made these ruffled tote bags for my nieces and just adore how darling they turned out. My four girls fell in love with these ruffled bags as well and have placed their orders... Oh my lots of ruffles in store for me!
For these bags I began with a ready made tote bag that can be purchased at Hobby Lobby or for a tad cheaper at Walmart. Walmart has a package of 3 totes for under $6.00, that is a great deal.
Supplies:
Tote bag
1/4- 1/2 yard each of 2 coordinating fabrics for the ruffles (I always get extra fabric so I chose to go with 1/2 yd. each.)
Ribbon
Fabric for flowers, if doing fabric flowers
Thread
There are many different ways to sew a ruffle. I do NOT claim to be a ruffle expert, just a ruffle admirer. Here is how I chose to sew the ruffles for my bags.
Lay out your ruffles first to find out where you want them before you begin to sew.
Once the front of your bag is finished with all it's beautiful ruffles, it is time to finish off the back.
There are two different looks for your bag. The first option takes the ruffle almost to the top of the bag and does not leave room for flowers. The second option does leave room at the top to add fabric flowers. I think both are super cute. Just depends on what you prefer.
Pin It Now!
Wednesday, May 30, 2012
Ruffle Tote Bags
Labels:
Crafts,
Creating,
Ruffle Bag,
Ruffle Tote Bag,
Ruffled Bag,
Ruffled Tote Bags,
Sewing,
Tote Bag
Saturday, May 26, 2012
Baseball Cake Pops and Baseball Cupcakes
Can it be? An actual post published? I am ecstatic to be back blogging again. So much has happened in my absence. One thing I have definitely come to realize is being a mommy to five young children, the wife of a Pastor and Homeschooling, to really make my plate overflow, keeps me busy! I honestly love the life God has graced me with and wouldn't want it any other way.
One big event in the month of May was my son's first Birthday. For those of you who don't know, the fact he is on this earth is nothing short of God's great hand at work. You can read more about that here.
To celebrate the joyous occasion, I made baseball cake pops and cupcakes. It seemed to be the perfect choice since my son is named Nolan Ryan after my hubby's favorite baseball player.
I do have to warn that the stitching on the cake pop proves more difficult than I anticipated. I tried different methods and the one that I found to work best was using red candy melts in a piping bag with a small writing tip. The food coloring pens do not get the job done! I also suggest looking at a baseball so you can follow the pattern in which the stitching flows around the ball.
Here is a quick tip I have found when working with candy melts. Since I do not own a double boiler or any other fancy candy melting contraption, I created my own. By using a small sauce pan with water in it and a small metal bowl to sit on top. It works wonderfully in melting the candy coating for the cake pops.
For the inside of the baseballs, I used white cake and white frosting since baseballs are white. The how to, on making cake pops can be found all over the web. Click here to see my Turkey shaped cake pop post to see some websites I have used for the "how to."
For the stitching on the cupcakes I used a gel writing/ decorating tube. The gel can also be used on the cake pops and then place them into the fridge to set. However the gel will not harden like the candy melts do. I must say, the gel is much easier to use! It just depends on what your plans are. If you are wrapping your pops or transporting them I recommend the candy melts and not the gel.
Pin It Now!
Labels:
Baseball Cake Pops,
Baseball Cupcake,
Cake Pops,
Cooking,
Life's Moments
Subscribe to:
Posts (Atom)